 BMW G310GS - Owner's Manual > Wheels
Effect of wheel size on chassis and suspension control systems
The wheel sizes are very important for the ABS. In particular, the diameter and the width of the vehicle's wheels are programmed into the control unit and are fundamental to all calculations.
Any change to these dimensions, caused for example by a switch to wheels other than the standard installed ones, can seriously affect the performance of the control systems.
The sensor rings are essential for correct wheel speed detection; they too must match the motorcycle's control systems and consequently cannot be replaced.
If you decide that you would like to fit non-standard wheels to your motorcycle, it is very important to consult a specialist workshop beforehand, preferably an authorised BMW Motorrad dealer.
Removing front wheel
- with centre stand OA
- Make sure the ground is level and firm and place the motorcycle on its centre stand.
- without centre stand OA
- Place the motorcycle on an auxiliary stand. BMW Motorrad recommends you use the BMW Motorrad rear-wheel stand.
- Install the rear-wheel stand.
- Lift the front of the motorcycle until the front wheel is clear of the ground, preferably using a BMW Motorrad front-wheel stand.
- Installing the front-wheel stand.
- Mask off the parts of the wheel rim that could be scratched when removing the brake caliper.
- Push apart the brake pads a little.
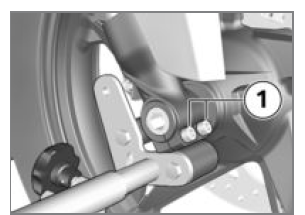
- Slacken clamping screws 1.
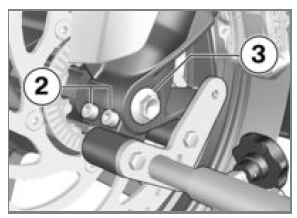
- Remove screw 3.
- Slacken clamping screws 2.
- Press quick-release axle slightly toward the inside, so as to be better able to grip it on the right-hand side.
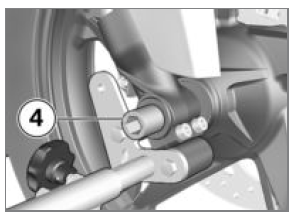
- Withdraw quick-release axle 4, support the front wheel when doing this.
- Set down front wheel and roll forwards out of the front suspension. Ensure you do not damage the wheel speed sensor in the process.
ATTENTION Unwanted inward movement of the brake pads
Component damage on attempt to install the brake caliper or because brake pads have to be forced apart
- Do not operate the brakes with a brake caliper not correctly secured.
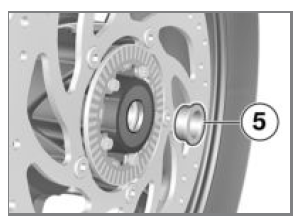
- Remove spacer bush 5 from the wheel hub.
Installing front wheel
WARNING Use of a non-standard wheel
Malfunctions in ABS operation
- See the information on the effect of wheel size on the ABS system at the start of this chapter.
ATTENTION Tightening threaded fasteners to incorrect tightening torque
Damage, or threaded fasteners work loose
- Always have the security of the fasteners checked by a specialist workshop, preferably an authorised BMW Motorrad dealer.
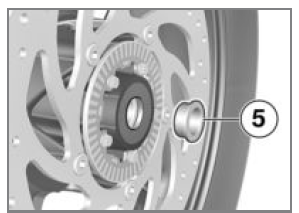
- Slip spacing bushing 5 into the wheel hub on the left-hand side.
ATTENTION Front wheel installed wrong way round
Risk of accident
- Note direction-of-rotation arrows on tyre or rim.
- Roll the front wheel into position between the front forks.
In this process, take care not to damage the wheel speed sensor.
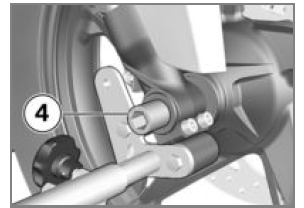
- Lift front wheel and fit quick-release axle 4.
- Remove front-wheel stand and firmly compress front forks several times. Do not operate the brake lever in this process.
- Installing the front-wheel stand.
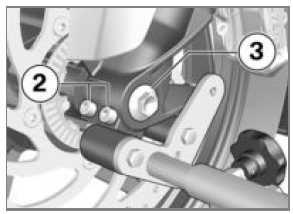
- Install screw 3 and tighten to specified torque. Counter-hold quick-release axle on the right-hand side.
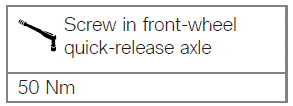
- Tighten clamping bolts 2 to the specified tightening torque.
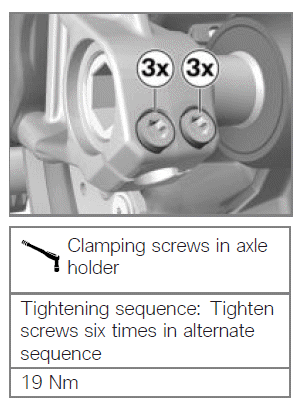
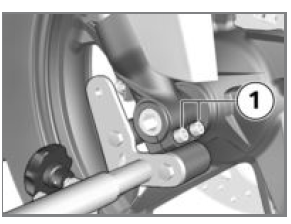
- Tighten clamping bolts 1 to the specified tightening torque.
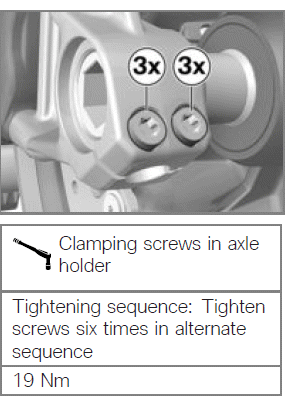
- Removing the front-wheel stand.
- Remove the adhesive tape from the wheel rim.
WARNING Brake pads not lying against the brake disc
Risk of accident due to delayed braking effect.
- Before driving, check that the brakes respond without delay.
- Operate the brake several times until the brake pads are bedded.
Removing rear wheel
- with centre stand OA
- Make sure the ground is level and firm and place the motorcycle on its centre stand.
- without centre stand OA
- Lift the motorcycle, preferably with a BMW Motorrad rear-wheel stand.
- Install the rear-wheel stand.
- Slip wooden chocks or similar under the rear wheel to prevent it from dropping out after the quick-release axle has been removed.
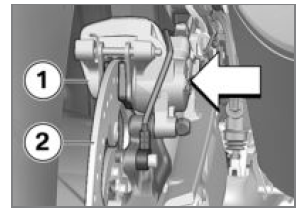
- Press brake caliper 1 against brake disc 2.
- Brake piston has been pushed back.
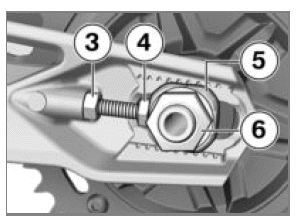
- Remove nut 6 using the right tool from the toolkit.
- Remove washer.
- Slacken locknuts 3 on left and right.
- Screw in the adjusting screws 4 on the left and right.
- Remove the chain tensioner 5 and push the quick-release axle to the right as far as it will go.
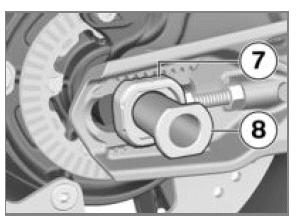
- Remove the quick-release axle 8 and remove the chain tensioner 7.
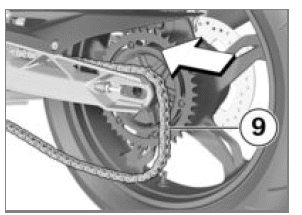
- Roll the rear wheel as far forward as possible and disengage chain 9 from the sprocket.
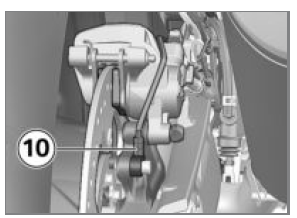
- When rolling the rear wheel clear of the motorcycle, take care not to damage wheel-speed sensor 10.
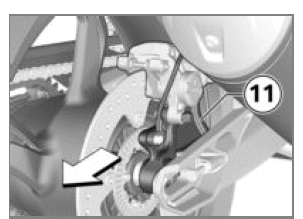
- Roll the rear wheel to the rear and clear of the swinging arm and at the same time pull brake-caliper carrier 11 back far enough to allow the rear wheel to clear it.
NOTICE The sprocket and the spacer sleeves on left and right are loose fits in the wheel. When removing, make sure that no parts are damaged or mislaid.
Installing the rear wheel
ATTENTION Tightening threaded fasteners to incorrect tightening torque
Damage, or threaded fasteners work loose
- Always have the security of the fasteners checked by a specialist workshop, preferably an authorised BMW Motorrad dealer.
- Roll the rear wheel on the support into the swinging arm as far as necessary to permit the brake-caliper carrier to be inserted.
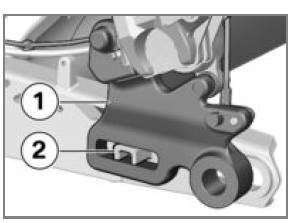
- Position the brake-caliper support 1 on the guide 2.
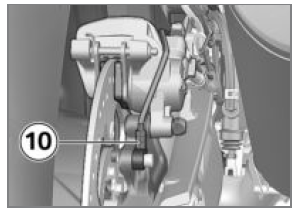
- When rolling the rear wheel into position, take care not to damage wheel-speed sensor 10.
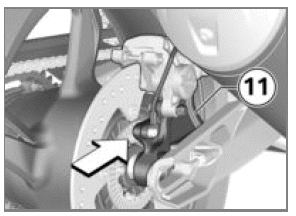
- Roll the rear wheel further into the swinging arm, while pushing brake-caliper carrier 11 forward at the same time.
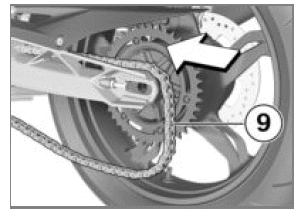
- Roll the rear wheel as far forward as possible and loop chain 9 over the sprocket.
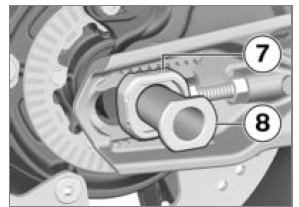
- Insert the quick-release axle 8 and the chain tensioner 7 into the swinging arm, brake-caliper support and rear wheel, making sure that you fit the quick-release axle securely into the chain tensioner.
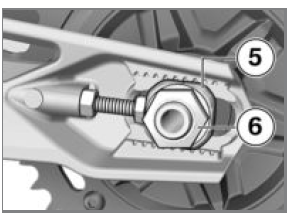
- Insert the left chain tensioner 5.
- Install nut 6 with its washer, but do not tighten the nut at this point.
- Adjust the chain tension.
See also:
 BMW G310GS - Owner's Manual > Wheel rims and tyres
Checking rims Make sure the ground is level and firm and place the motorcycle on its stand. Visually inspect the rims for defects. Have any damaged rims inspected by a specialist workshop and replaced if necessary, preferably by an authorised BMW Motorrad dealer.
 BMW G310GS - Owner's Manual > Chain
Adjust the chain tension Make sure the ground is level and firm and place the motorcycle on its stand. Slacken nut 6. Slacken locknuts 3 on left and right. Use adjusting screws 4 on left and right to adjust chain tension. Checking chain tension. Ensure that the notch in the chain tensioner 5 is adjusted to the same scale value on the right and left. Tighten locknuts 3 on left and right to the specified tightening torque. Tighten nut 6 to the specified tightening torque.

 BMW G310GS
 Honda CBR125RW
 Husqvarna 401 Vitpilen
 KTM 890 Duke R
 Mash Dirt Track 650
 Peugeot Kisbee
 Yamaha Tracer MT-09
 Honda CBR125RW
 Peugeot Kisbee
 Yamaha Tracer MT-09