 Yamaha Tracer MT09TRA - Service manual > Cylinder head

Removing the cylinder head
1. Remove:
- Intake camshaft
- Exhaust camshaft
Refer to "REMOVING THE CAMSHAFTS"
2. Remove:
- Cylinder head bolt (M6) (x 4)
- Cylinder head bolt (M9) (x 8)
TIP
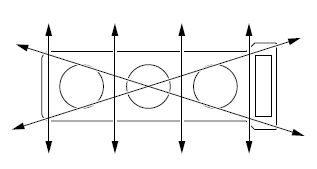
- Loosen the bolts in the proper sequence as shown.
- Loosen each bolt 1/2 of a turn at a time. After all of the bolts are fully loosened, remove them.

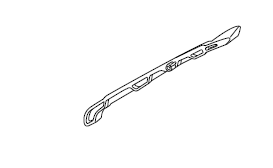
Checking the timing chain guide (exhaust side)
1. Check:
- Timing chain guide (exhaust side) Damage/wear→ Replace.

Checking the cylinder head
1. Eliminate:
- Combustion chamber carbon deposits (with a rounded scraper)
TIP
Do not use a sharp instrument to avoid damaging or scratching:
- Spark plug bore threads
- Valve seats
2. Check:
- Cylinder head
Damage/scratches → Replace.
- Cylinder head water jacket
Mineral deposits/rust → Eliminate.
3. Measure:
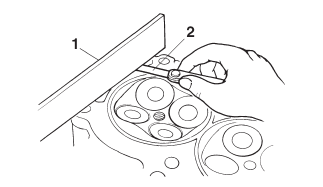
Cylinder head warpage Out of specification → Resurface the cylinder head.
 Warpage limit 0.10 mm (0.0039 in)

a. Place a straightedge "1" and a thickness gauge "2" across the cylinder head.
 Thickness gauge 90890-03180
Feeler gauge set YU-26900-9

b. Measure the warpage.
c. If the limit is exceeded, resurface the cylinder head as follows.
d. Place a 400-600 grit wet sandpaper on the surface plate and resurface the cylinder head using a figure-eight sanding pattern.
TIP
To ensure an even surface, rotate the cylinder head several times.
Installing the cylinder head
1. Install:
- Timing chain guide (exhaust side) "1"
- Cylinder head gasket "2"

- Dowel pins "3"

2. Install:
- Cylinder head
- Cylinder head bolt (M6) (x 4)
- Cylinder head bolt (M9) (x 8)

TIP
- Pass the timing chain through the timing chain cavity.
- Lubricate the cylinder head bolt (M9) thread and mating surface with engine oil.
3. Tighten:
- Cylinder head bolt "1"-"8"
- Cylinder head bolt "9"-"12"
 Cylinder head bolt "1"-"8"
1st: 25 Nm (2.5 m*kgf, 18 ft*lbf) *2nd: 16 Nm (1.6 m*kgf, 12 ft*lbf) +90º
Cylinder head bolt "9"-"12" 10 Nm (1.0 m*kgf, 7.2 ft*lbf)
* Following the tightening order, loosen the bolt one by one and then retighten it to the specific torque and the specific angle.
TIP
Tighten the cylinder head bolts "1"-"8" in the tightening sequence as shown and torque them in 2 stages.

See also:
 Yamaha Tracer MT09TRA - Service manual > Camshafts
Removing the camshafts
 Yamaha Tracer MT09TRA - Service manual > Valves and valve springs
Removing the valves The following procedure applies to all of the valves and related components.

 BMW G310GS
 Honda CBR125RW
 Husqvarna 401 Vitpilen
 KTM 890 Duke R
 Mash Dirt Track 650
 Peugeot Kisbee
 Yamaha Tracer MT-09
 Honda CBR125RW
 Peugeot Kisbee
 Yamaha Tracer MT-09