 Yamaha Tracer MT09TRA - Service manual > Front wheelvers

Removing the front wheel
NOTICE
Keep magnets (including magnetic pick-up tools, magnetic screwdrivers, etc.) away from the front wheel sensor "1", otherwise the wheel sensor may be damaged, resulting in improper performance of the ABS.

1. Stand the vehicle on a level surface
WARNING
Securely support the vehicle so that there is no danger of it falling over.
2. Remove:
- Front brake caliper (left)
- Front brake caliper (right)
- Front wheel sensor
NOTICE
- Do not apply the brake lever when removing the brake calipers.
- Be sure not to contact the sensor electrode to any metal part when removing the front wheel sensor from the sensor housing.
3. Elevate:
- Front wheel
TIP
Place the vehicle on a suitable stand so that the front wheel is elevated.
4. Loosen:
- Wheel axle pinch bolt
5. Remove:
- Wheel axle
- Front wheel
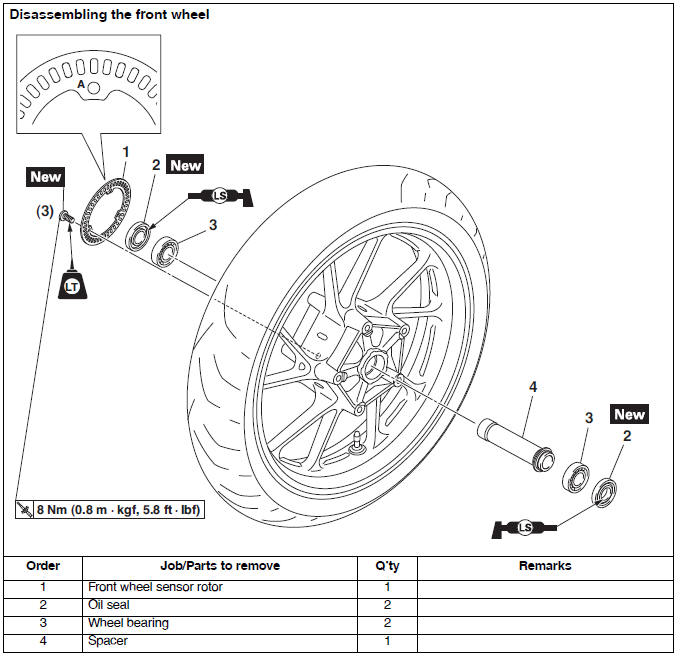
Disassembling the front wheel
NOTICE
- Do not drop the wheel sensor rotor or subject it to shocks.
- If any solvent gets on the wheel sensor rotor, wipe it off immediately.
1. Remove:
- Oil seals
- Wheel bearings
a. Clean the surface of the front wheel hub.
b. Remove the oil seals "1" with a flat-head screwdriver.
TIP
To prevent damaging the wheel, place a rag "2" between the screwdriver and the wheel surface.

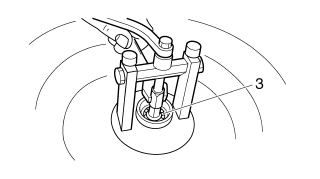
c. Remove the wheel bearings "3" with a general bearing puller.
Checking the front wheel
1. Check:
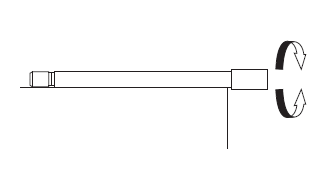
- Wheel axle
Roll the wheel axle on a flat surface.
Bends → Replace.
WARNING
Do not attempt to straighten a bent wheel axle.
2. Check:
- Tire
- Front wheel
Damage/wear → Replace.
Refer to "CHECKING THE TIRES" and "CHECKING THE WHEELS"
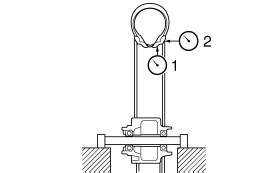
3. Measure:
- Radial wheel runout "1"
- Lateral wheel runout "2"
Over the specified limits → Replace.
 Radial wheel runout
limit 1.0 mm (0.04 in) Lateral wheel runout limit 0.5 mm (0.02 in)
4. Check:
- Wheel bearings
Front wheel turns roughly or is loose → Replace the wheel bearings.
- Oil seals
Damage/wear → Replace.
Assembling the front wheel
NOTICE
- Do not drop the wheel sensor rotor or subject it to shocks.
- If any solvent gets on the wheel sensor rotor, wipe it off immediately.
1. Install:
- Wheel bearings

- Oil seals

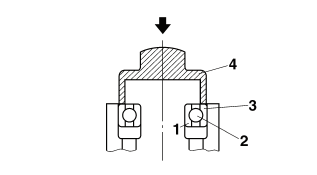
a. Install the new wheel bearing (right side).
NOTICE
Do not contact the wheel bearing inner race "1" or balls "2". Contact should be made only with the outer race "3".
TIP
Use a socket "4" that matches the diameter of the wheel bearing outer race.
b. Install the spacer.
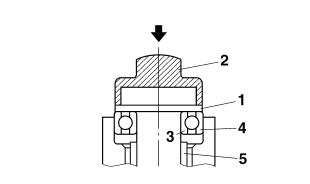
c. Install the new wheel bearing (left side).
TIP
Place a suitable washer "1" between the socket "2" and the bearing so that both the inner race "3" and outer race "4" are pressed at the same time, and then press the bearing until the inner race makes contact with the spacer "5".
d. Install the new oil seals.
2. Install:
- Front wheel sensor rotor
 Wheel sensor rotor bolt
8 Nm (0.8 m*kgf, 5.8 ft*lbf) LOCTITE
NOTICE
Replace the wheel sensor rotor bolts with new ones.
TIP
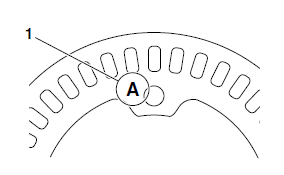
Install the wheel sensor rotor with the stamped mark "1" facing outward.
3. Measure:
- Wheel sensor rotor runout
Out of specification → Correct the wheel sensor rotor runout or replace the wheel sensor rotor.
Refer to "MAINTENANCE OF THE FRONT WHEEL SENSOR AND SENSOR ROTOR"
 Wheel sensor rotor
runout limit 0.25 mm (0.01 in)
Maintenance of the front wheel sensor and sensor Rotor
NOTICE
- Handle the ABS components with care since they have been accurately
adjusted.
Keep them away from dirt and do not subject them to shocks.
- The front wheel sensor cannot be disassembled.
Do not attempt to disassemble it.
If faulty, replace with a new one.
- Keep any type of magnets (including magnetic pick-up tools, magnetic screwdrivers, etc.) away from the front wheel sensor or front wheel sensor rotor.
- Do not drop or shock the wheel sensor or the wheel sensor rotor.
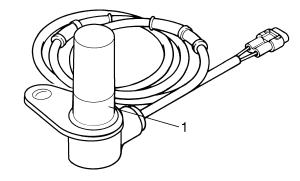
1. Check:
- Front wheel sensor "1" Cracks/bends/distortion → Replace.
Iron powder/dust → Clean.
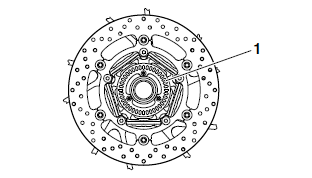
2. Check:
Front wheel sensor rotor "1" Cracks/damage/scratches → Replace the front wheel sensor rotor.
Iron powder/dust/solvent → Clean.
TIP
- The wheel sensor rotor is installed on the inner side of the wheel hub.
- When cleaning the wheel sensor rotor, be careful not to damage the surface of the sensor rotor.
3. Measure:
- Wheel sensor rotor runout
Out of specification → Clean the installation surface of the wheel sensor rotor and correct the wheel sensor rotor runout, or replace the wheel sensor rotor.
 Wheel sensor rotor
runout limit 0.25 mm (0.01 in)
a. Hold the dial gauge at a right angle against the wheel sensor rotor surface.
b. Measure the wheel sensor rotor runout.
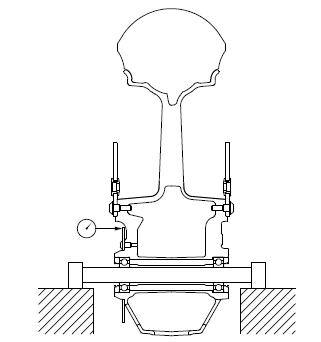
c. If the runout is above specification, remove the sensor rotor from the wheel, rotate it by two or three bolt holes, and then install it.
 Wheel sensor rotor bolt
8 Nm (0.8 m*kgf, 5.8 ft*lbf) LOCTITE
NOTICE
Replace the wheel sensor rotor bolts with new ones.
d. If the runout is still above specification, replace the wheel sensor rotor.
Adjusting the front wheel static balance
TIP
- After replacing the tire, wheel or both, the front wheel static balance should be adjusted.
- Adjust the front wheel static balance with the brake disc installed.
1. Remove:
- Balancing weight(s)
2. Find:
- Front wheel's heavy spot
TIP
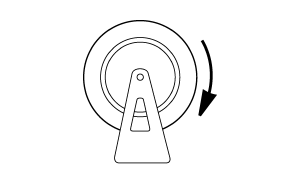
Place the front wheel on a suitable balancing stand.
a. Spin the front wheel.
b. When the front wheel stops, put an "X1 " mark at the bottom of the wheel.
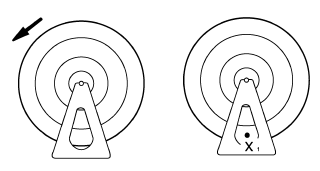
c. Turn the front wheel 90º so that the "X1 " mark is positioned as shown.
d. Release the front wheel.
e. When the wheel stops, put an "X2 " mark at the bottom of the wheel.
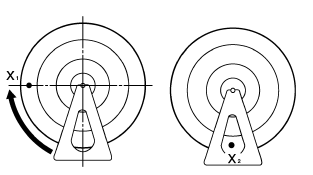
f. Repeat steps (c) through (e) several times until all the marks come to rest at the same spot.
g. The spot where all the marks come to rest is the front wheel's heavy spot "X".
3. Adjust:
- Front wheel static balance
a. Install a balancing weight "1" onto the rim exactly opposite the heavy spot "X".
TIP
Start with the lightest weight.
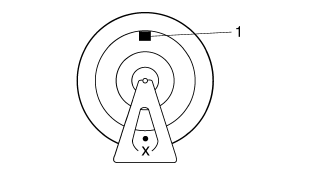
b. Turn the front wheel 90º so that the heavy spot is positioned as shown.
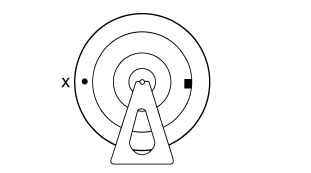
c. If the heavy spot does not stay in that position, install a heavier weight.
d. Repeat steps (b) and (c) until the front wheel is balanced.
4. Check:
- Front wheel static balance
a. Turn the front wheel and make sure it stays at each position shown.
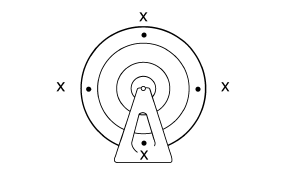
b. If the front wheel does not remain stationary at all of the positions, rebalance it.
Installing the front wheel (disc brake)
1. Install:
- Front brake discs
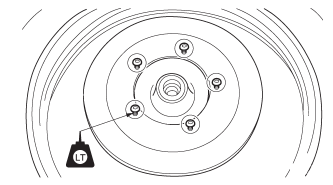
 Front brake disc bolt 18
Nm (1.8 m*kgf, 13 ft*lbf) LOCTITE
NOTICE
Replace the brake disc bolts with new ones.
TIP
Tighten the brake disc bolts in stages and in a crisscross pattern.
2. Check:
- Front brake discs Refer to "CHECKING THE FRONT BRAKE DISCS"
3. Lubricate:
- Oil seal lips
 Recommended lubricant
Lithium-soap-based grease
4. Install:
- Collar
- Front wheel sensor housing
- Front wheel
- Front wheel axle
TIP
Align the slot "a" in the sensor housing with the projection "b" of the front fork before assembly.

5. Tighten:
- Front wheel axle
- Front wheel axle pinch bolt
 Front wheel axle 65 Nm
(6.5 m*kgf, 47 ft*lbf) Front wheel axle pinch bolt 23 Nm (2.3 m*kgf, 17 ft*lbf)
NOTICE
Before tightening the wheel axle, push down hard on the handlebars several times and check if the front fork rebounds smoothly.
TIP
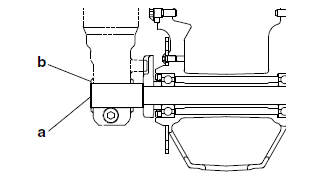
Check that wheel axle end "a" is flush with front folk surface "b" and then tighten the wheel axle pinch bolt. If end "a" is not flush with surface "b", align the ends manually or with a plastic hammer.
6. Install:
- Front wheel sensor
- Front wheel sensor protector
 Front wheel sensor bolt
7 Nm (0.7 m*kgf, 5.1 ft*lbf) Front wheel sensor protector bolt 10 Nm (1.0 m*kgf,
7.2 ft*lbf)
NOTICE
Make sure there are no foreign materials in the front wheel sensor rotor and front wheel sensor. Foreign materials cause damage to the front wheel sensor rotor and front wheel sensor.
TIP
When installing the front wheel sensor, check the front wheel sensor lead for twists.
7. Measure:
- Distance "a" (between the wheel sensor rotor "1" and front wheel sensor "2") Out of specification → Check the wheel bearing for looseness, and the front wheel sensor and sensor rotor installation conditions (warpage caused by overtorque, wrong installation direction, rotor decentering, LOCTITE on the mounting surface of the rotor, deformation caused by an impact during service and caught foreign materials). If there is any defective part, repair or replace the defective part.
 Distance "a" (between
the front wheel sensor rotor and front wheel sensor) 0.9-1.5 mm (0.04-0.06 in)
TIP
Measure the distance between the front wheel sensor rotor and front wheel sensor in several places in one rotation of the front wheel. Do not turn the front wheel while the thickness gauge is installed. This may damage the front wheel sensor rotor and the front wheel sensor.
 Thickness gauge
90890-03180 Feeler gauge set YU-26900-9

8. Install:
- Front brake calipers
- Front wheel sensor lead holder
 Front brake caliper
bolt 35 Nm (3.5 m*kgf, 25 ft*lbf)
WARNING
Make sure the brake hose is routed properly.
See also:
 Yamaha Tracer MT09TRA - Service manual > General chassis
General chassis (1)

 BMW G310GS
 Honda CBR125RW
 Husqvarna 401 Vitpilen
 KTM 890 Duke R
 Mash Dirt Track 650
 Peugeot Kisbee
 Yamaha Tracer MT-09
 Honda CBR125RW
 Peugeot Kisbee
 Yamaha Tracer MT-09