 Yamaha Tracer MT09TRA - Service manual > Rear wheel


Removing the rear wheel
NOTICE
Keep magnets (including magnetic pick-up tools, magnetic screwdrivers, etc.) away from the rear wheel sensor "1", otherwise the wheel sensor may be damaged, resulting in improper performance of the ABS.
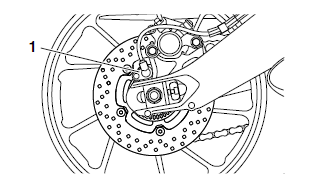
1. Stand the vehicle on a level surface.
WARNING
Securely support the vehicle so that there is no danger of it falling over.
TIP
Place the vehicle on the centerstand so that the rear wheel is elevated.
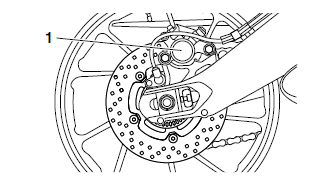
2. Remove:
- Rear brake caliper "1"
- Rear wheel sensor
NOTICE
- Do not depress the brake pedal when removing the brake caliper.
- Be sure not to contact the sensor electrode to any metal part when removing the rear wheel sensor from the rear brake caliper bracket.
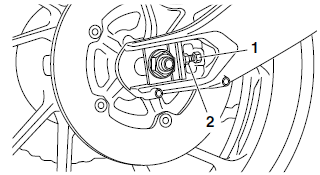
3. Loosen:
- Locknuts "1"
- Adjusting bolts "2"
4. Remove:
- Wheel axle nut "1"
- Washer
- Wheel axle "2"
- Rear wheel
- Brake caliper bracket
NOTICE
Be sure to remove the rear wheel sensor before removing the brake caliper bracket, otherwise the sensor could be damaged.
TIP
Push the rear wheel forward and remove the drive chain from the rear wheel sprocket.

Disassembling the rear wheel
NOTICE
- Do not drop the wheel sensor rotor or subject it to shocks.
- If any solvent gets on the wheel sensor rotor, wipe it off immediately.
1. Remove:
- Oil seal
- Wheel bearings
Refer to "DISASSEMBLING THE FRONT WHEEL"
Checking the rear wheel
1. Check:
- Wheel axle
- Wheel bearings
- Oil seals
Refer to "CHECKING THE FRONT WHEEL"
2. Check:
- Tire
- Rear wheel
Damage/wear → Replace.
Refer to "CHECKING THE TIRES" and "CHECKING THE WHEELS"
3. Measure:
- Radial wheel runout
- Lateral wheel runout Refer to "CHECKING THE FRONT WHEEL"
Checking the rear wheel drive hub
1. Check:
- Rear wheel drive hub "1" Cracks/damage → Replace.
- Rear wheel drive hub dampers "2" Damage/wear → Replace.

Checking and replacing the rear wheel sprocket
1. Check:
- Rear wheel sprocket
More than 1/4 tooth "a" wear → Replace the drive sprocket, the rear wheel sprocket and the drive chain as a set.
Bent teeth → Replace the drive sprocket, the rear wheel sprocket and the drive chain as a set.
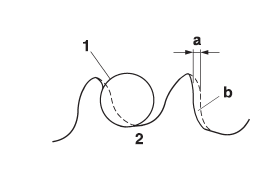
b. Correct
1. Drive chain roller
2. Rear wheel sprocket
2. Replace:
- Rear wheel sprocket
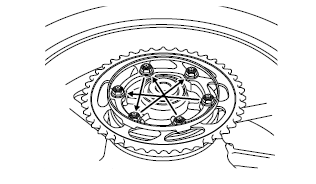
a. Remove the rear wheel sprocket nuts and the rear wheel sprocket.
b. Clean the rear wheel drive hub with a clean cloth, especially the surfaces that contact the sprocket.
c. Install the new rear wheel sprocket.
 Rear wheel sprocket nut
80 Nm (8.0 m*kgf, 58 ft*lbf)
TIP
Tighten the rear wheel sprocket nuts in stages and in a crisscross pattern.
Assembling the rear wheel
NOTICE
- Do not drop the wheel sensor rotor or subject it to shocks.
- If any solvent gets on the wheel sensor rotor, wipe it off immediately.
1. Install:
- Wheel bearings

- Oil seal

Refer to "ASSEMBLING THE FRONT WHEEL"
Maintenance of the rear wheel sensor and sensor Rotor
NOTICE
- Handle the ABS components with care since they have been accurately
adjusted.
Keep them away from dirt and do not subject them to shocks.
- The rear wheel sensor cannot be disassembled.
Do not attempt to disassemble it. If faulty, replace with a new one.
- Keep any type of magnets (including magnetic pick-up tools, magnetic screwdrivers, etc.) away from the rear wheel sensor or rear wheel sensor rotor.
- Do not drop or shock the wheel sensor or the wheel sensor rotor.
1. Check:
- Rear wheel sensor Refer to "MAINTENANCE OF THE FRONT WHEEL SENSOR AND SENSOR ROTOR"
2. Check:
- Rear wheel sensor rotor Refer to "MAINTENANCE OF THE FRONT WHEEL SENSOR AND SENSOR ROTOR"
3. Measure:
- Wheel sensor rotor runout Refer to "MAINTENANCE OF THE FRONT WHEEL SENSOR AND SENSOR ROTOR"
Adjusting the rear wheel static balance
TIP
- After replacing the tire, wheel or both, the rear wheel static balance should be adjusted.
- Adjust the rear wheel static balance with the brake disc and rear wheel drive hub installed.
1. Adjust:
- Rear wheel static balance Refer to "ADJUSTING THE FRONT WHEEL STATIC BALANCE"
Installing the rear wheel (disc brake)
1. Install:
- Rear brake disc
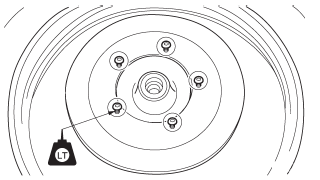
 Rear brake disc bolt 30
Nm (3.0 m*kgf, 22 ft*lbf) LOCTITE
NOTICE
Replace the brake disc bolts with new ones.
TIP
Tighten the brake disc bolts in stages and in a crisscross pattern.
2. Check:
- Rear brake disc Refer to "CHECKING THE REAR BRAKE DISC"
3. Lubricate:
- Oil seal lips
 Recommended lubricant
Lithium-soap-based grease
4. Install:
- Collars
- Brake caliper bracket
- Rear wheel
- Adjusting blocks
- Wheel axle
- Washer
- Wheel axle nut
TIP
- Do not install the brake caliper.
- Align the projection "a" in the swingarm with the slot "b" of the brake caliper bracket.
- Install the adjusting block so that projection "c" faces to the front of the vehicle.

A. Left side
B. Right side
5. Install:
- Rear brake caliper
- Rear brake caliper bolts
6. Adjust:
- Drive chain slack
Refer to "ADJUSTING THE DRIVE CHAIN SLACK"
 Drive chain slack
5.0-15.0 mm (0.20-0.59 in)
7. Tighten:
- Wheel axle nut
- Rear brake caliper bolts
 Rear wheel axle nut 150
Nm (15 m*kgf, 108 ft*lbf) Rear brake caliper bolt (front) 27 Nm (2.7 m*kgf, 20
ft*lbf) Rear brake caliper bolt (rear) 22 Nm (2.2 m*kgf, 16 ft*lbf) LOCTITE
WARNING
Make sure the brake hose is routed properly.
TIP
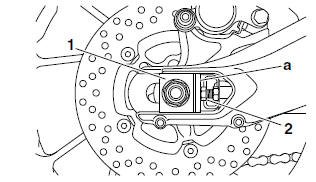
When tightening the wheel axle nut, there should be no clearance "a" between the adjusting block "1" and adjusting bolt "2".
8. Install:
- Rear wheel sensor
 Rear wheel sensor bolt 7
Nm (0.7 m*kgf, 5.1 ft*lbf)
NOTICE
Make sure there are no foreign materials in the rear wheel sensor rotor and rear wheel sensor. Foreign materials cause damage to the rear wheel sensor rotor and rear wheel sensor.
TIP
When installing the rear wheel sensor, check the rear wheel sensor lead for twists.
9. Measure:
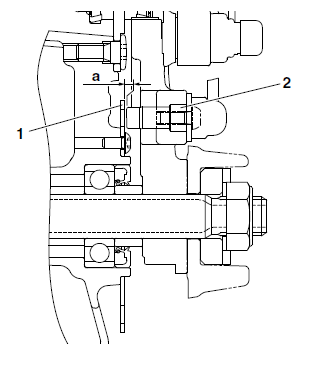
- Distance "a" (between the wheel sensor rotor "1" and rear wheel sensor "2")
Out of specification → Check the wheel bearing for looseness, and the rear wheel sensor and sensor rotor installation conditions (warpage caused by overtorque, wrong installation direction, rotor decentering, LOCTITE on the mounting surface of the rotor, deformation caused by an impact during service and caught foreign materials). If there is any defective part, repair or replace the defective part.
 Distance "a" (between
the rear wheel sensor rotor and rear wheel sensor) 0.7-1.4 mm (0.03-0.05 in)
TIP
Measure the distance between the rear wheel sensor rotor and rear wheel sensor in several places in one rotation of the rear wheel. Do not turn the rear wheel while the thickness gauge is installed. This may damage the rear wheel sensor rotor and the rear wheel sensor.
 Thickness gauge
90890-03180
Feeler gauge set YU-26900-9


 BMW G310GS
 Honda CBR125RW
 Husqvarna 401 Vitpilen
 KTM 890 Duke R
 Mash Dirt Track 650
 Peugeot Kisbee
 Yamaha Tracer MT-09
 Honda CBR125RW
 Peugeot Kisbee
 Yamaha Tracer MT-09