 Yamaha Tracer MT09TRA - Service manual > Oil pump


Checking the sprocket and chain
1. Check:
- Oil pump drive sprocket Refer to "CHECKING THE CLUTCH HOUSING"
2. Check:
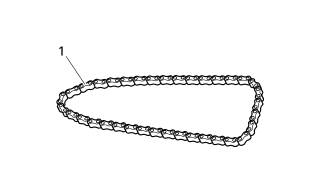
Oil pump drive chain "1", Damage/stiffness → Replace the oil pump drive chain and oil pump drive sprocket (clutch housing) as a set.
Checking the oil pump
1. Check:
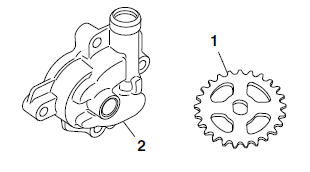
- Oil pump driven sprocket "1"
- Oil pump housing "2"
Cracks/damage/wear → Replace the defective part(s).
2. Measure:
- Inner-rotor-to-outer-rotor-tip clearance "a"
- Outer-rotor-to-oil-pump-housing clearance "b"
- Oil-pump-housing-to-inner-rotor-and-outerrotor clearance "c"
Out of specification → Replace the defective part(s).
 Inner-rotor-to-outer-rotor-tip
clearance Less than 0.120 mm (0.0047 in)
Limit 0.20 mm (0.0079 in)
Outer-rotor-to-oil-pump-housing clearance 0.09-0.19 mm (0.0035-0.0075 in)
Limit 0.21 mm (0.0083 in)
Oil-pump-housing-to-inner-andouter- rotor clearance 0.06-0.13 mm (0.0024-0.0051 in)
Limit 0.16 mm (0.0065 in)
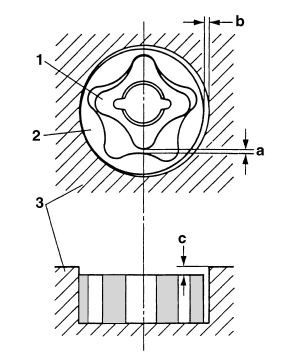
1. Inner rotor
2. Outer rotor
3. Oil pump housing
3. Check:
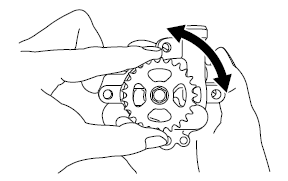
- Oil pump operation Rough movement → Repeat steps (1) and (2) or replace the defective part(s).
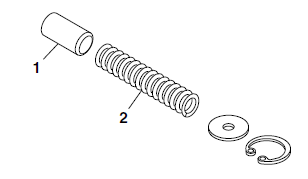
Checking the relief valve
1. Check:
- Relief valve "1"
- Spring "2"
Damage/wear → Replace the oil pump assembly.
Assembling the oil pump
1. Lubricate:
- Inner rotor
- Outer rotor
- Oil pump shaft (with the recommended lubricant)
 Recommended lubricant
Engine oil
2. Install:
- Outer rotor "1"
- Inner rotor "2"
- Pin "3"
- Oil pump cover "4"
- Oil pump cover screw
 Oil pump cover screw
3.8 Nm (0.38 m*kgf, 2.8 ft*lbf)
TIP
Align the pin "3" in the oil pump shaft with the groove in the inner rotor "2".

3. Check:
- Oil pump operation Refer to "CHECKING THE OIL PUMP"
Installing the oil pump
1. Install:
- Oil pump "1"
- Oil pump bolts "2"
 Oil pump bolt 10 Nm (1.0
m*kgf, 7.2 ft*lbf)
- Oil pump driven sprocket "3"
 Oil pump driven sprocket
bolt 15 Nm (1.5 m*kgf, 11 ft*lbf) LOCTITE
NOTICE
After installing the oil pump drive chain and driven sprocket, make sure the oil pump turns smoothly.
TIP
- 1RC mark of the oil pump driven sprocket is installed at oil pump side.
- Install the oil pump drive chain onto the oil pump driven sprocket.

Oil pan

A. MT09TRA for Europe: RN29F0011886 and after MT09TRAG for Oceania: RN29K 0000556 and after
Removing the oil pan
1. Remove:
- Oil level switch "1"
- Oil pan "2"
- Oil pan gasket
TIP
Loosen each bolt 1/4 of a turn at a time, in stages and in a crisscross pattern. After all of the bolts are fully loosened, remove them.

A. MT09TRA for Europe: RN29F0011886 and after MT09TRAG for Oceania: RN29K 0000556 and after
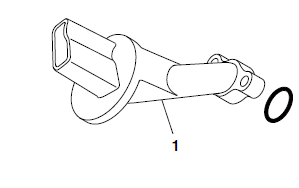
Checking the oil strainer
1. Check:
- Oil strainer "1" Damage → Replace.
Contaminants → Clean with solvent.
Installing the oil pan
1. Install:
- Gasket

- Oil pan "1"
 Oil pan bolt 10 Nm (1.0
m*kgf, 7.2 ft*lbf)
- Oil level switch "2"
 Oil level switch bolt 10
Nm (1.0 m*kgf, 7.2 ft*lbf)
- Engine oil drain bolt "3"
 Engine oil drain bolt
43 Nm (4.3 m*kgf, 31 ft*lbf)
WARNING
Always use new copper washers.
TIP
- Tighten the oil pan bolts in stages and in a crisscross pattern.
- Lubricate the oil level switch O-ring with lithium- soap-based grease.

A. MT09TRA for Europe: RN29F0011886 and after MT09TRAG for Oceania: RN29K 0000556 and after
See also:
 Yamaha Tracer MT09TRA - Service manual > Shift shaft
Checking the shift shaft 1. Check: Shift shaft "1" Bends/damage/wear → Replace. Shift shaft spring "2" Collar
 Yamaha Tracer MT09TRA - Service manual > Crankcase
Disassembling the crankcase 1. Place the engine upside down. 2. Remove: Crankcase bolt (x 30)

 BMW G310GS
 Honda CBR125RW
 Husqvarna 401 Vitpilen
 KTM 890 Duke R
 Mash Dirt Track 650
 Peugeot Kisbee
 Yamaha Tracer MT-09
 Honda CBR125RW
 Peugeot Kisbee
 Yamaha Tracer MT-09