 Yamaha Tracer MT09TRA - Service manual > Crankcase

Disassembling the crankcase
1. Place the engine upside down.
2. Remove:
- Crankcase bolt (x 30)
TIP
- Loosen each bolt 1/4 of a turn at a time, in stages and in a crisscross pattern. After all of the bolts are fully loosened, remove them.
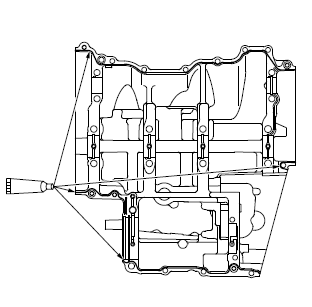
- Loosen the bolts in the proper sequence as shown.
- The numbers embossed on the crankcase indicate the crankcase tightening sequence.

3. Remove:
- Lower crankcase
NOTICE
Tap on one side of the crankcase with a softface hammer. Tap only on reinforced portions of the crankcase, not on the crankcase mating surfaces. Work slowly and carefully and make sure the crankcase halves separate evenly.
4. Remove:
- Dowel pins
5. Remove:
- Crankshaft journal lower bearing
- Balancer shaft journal bearing (from the lower crankcase)
TIP
Identify the position of each part very carefully so that it can be reinstalled in its original place
Checking the crankcase
1. Thoroughly wash the crankcase halves in a mild solvent.
2. Thoroughly clean all the gasket surfaces and crankcase mating surfaces.
3. Check:
- Crankcase Cracks/damage → Replace.
- Oil delivery passages Obstruction → Blow out with compressed air.
Assembling the crankcase
1. Lubricate:
- Crankshaft journal bearing inner surface (with the recommended lubricant)
 Recommended lubricant
Engine oil
2. Apply:
- Sealant (onto the crankcase mating surfaces)
 Yamaha bond No. 1215
90890-85505 (Three bond No.1215)
TIP
Do not allow any sealant to come into contact with the oil gallery or crankshaft journal bearings, or balancer shaft journal bearings.

3. Install:
- Dowel pins
4. Set the shift drum assembly and transmission gears in the neutral position.
5. Install:
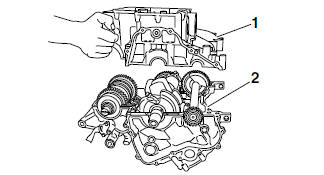
- Lower crankcase "1" (onto the upper crankcase "2")
NOTICE
Before tightening the crankcase bolts, make sure the transmission gears shift correctly when the shift drum assembly is turned by hand.

6. Install:
- Crankcase bolt (x 30)
TIP
- Lubricate the bolts "1"-"8" thread, mating surfaces and washers with engine oil.
- Lubricate the bolts "9"-"12" thread, mating surfaces and O-rings with engine oil.
- Lubricate the bolts "13"-"30" thread and mating surfaces with engine oil.
- M8 x 100 mm (3.94 in) bolts with washers: "7", "8"

- M8 x 85 mm (3.35 in) bolts with washers: "1"- "6"

- M8 x 78 mm (3.07 in) bolts with new O-rings: "9"-"12"
- M8 x 60 mm (2.36 in) bolts: "13", "14"
- M6 x 85 mm (3.35 in) bolt: "18"
- M6 x 65 mm (2.56 in) bolts: "15", "16"
- M6 x 65 mm (2.56 in) bolt: "26"
- M6 x 50 mm (1.97 in) bolts: "17", "19"-"21", "23"-"25", "27"-"30"
- M6 x 40 mm (1.57 in) bolt: "22"

7. Tighten:
- Crankcase bolts "1"-"8"
 Crankcase bolts "1"-"6"
1st: 25 Nm (2.5 m*kgf, 18 ft*lbf) *2nd: 15 Nm (1.5 m*kgf, 11 ft*lbf) 3rd: +60º
Crankcase bolts "7"-"8" 1st: 25 Nm (2.5 m*kgf, 18 ft*lbf) *2nd: 18 Nm (1.8
m*kgf, 13 ft*lbf) 3rd: +60º
* Following the tightening order, loosen the bolt one by one and then retighten it to the specific torque.
WARNING
If the bolt is tightened more than the specified angle, do not loosen the bolt and then retighten it. Instead, replace the bolt with a new one and perform the procedure again.
NOTICE
Do not use a torque wrench to tighten the bolt to the specified angle.
TIP
Tighten the bolts in the tightening sequence cast on the crankcase.

8. Tighten:
- Crankcase bolts "9"-"30"
 Crankcase bolts "9"-"14"
24 Nm (2.4 m*kgf, 17 ft*lbf) Crankcase bolts "15"-"30" 10 Nm (1.0 m*kgf, 7.2
ft*lbf)
TIP
Tighten the bolts in the tightening sequence cast on the crankcase.

See also:
 Yamaha Tracer MT09TRA - Service manual > Oil pump
Checking the sprocket and chain
 Yamaha Tracer MT09TRA - Service manual > Connecting rods and pistons
Removing the connecting rods and pistons The following procedure applies to all of the connecting rods and pistons. Connecting rod cap "1" Connecting rod Big end bearings

 BMW G310GS
 Honda CBR125RW
 Husqvarna 401 Vitpilen
 KTM 890 Duke R
 Mash Dirt Track 650
 Peugeot Kisbee
 Yamaha Tracer MT-09
 Honda CBR125RW
 Peugeot Kisbee
 Yamaha Tracer MT-09