 Yamaha Tracer MT09TRA - Service manual > Connecting rods and pistons

Removing the connecting rods and pistons
The following procedure applies to all of the connecting rods and pistons.
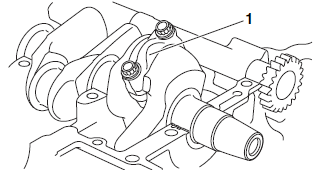
- Connecting rod cap "1"
- Connecting rod
- Big end bearings
TIP
- Identify the position of each big end bearing so that it can be reinstalled in its original place.
- After removing the connecting rods and connecting rod caps, care should be taken not to damage the mating surfaces of the connecting rods and connecting rod caps.
2. Remove:
- Piston pin clips "1"
- Piston pin "2"
- Piston "3"
NOTICE
Do not use a hammer to drive the piston pin out.
TIP
- For reference during installation, put identification marks on the piston crown.
- Before removing the piston pin, deburr the piston pin clip groove and
the piston pin bore area.
If both areas are deburred and the piston pin is still difficult to remove, remove it with the piston pin puller set "4".
 Piston pin puller set
90890-01304
Piston pin puller YU-01304

3. Remove:
- Top ring
- 2nd ring
- Oil ring
TIP
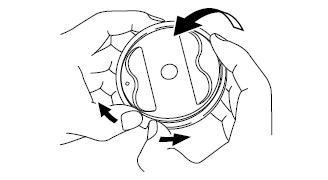
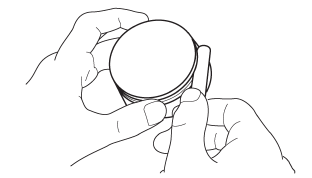
When removing a piston ring, open the end gap with your fingers and lift the other side of the ring over the piston crown.
Checking the cylinder and piston
1. Check:
- Piston wall
- Cylinder wall
Vertical scratches → Replace the cylinder, and replace the piston and piston rings as a set.
2. Measure:
- Piston-to-cylinder clearance
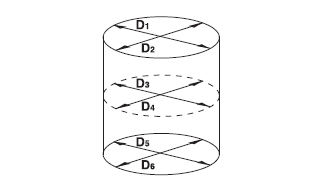
a. Measure cylinder bore "C" with the cylinder bore gauge.
TIP
Measure cylinder bore "C" by taking side-to-side and front-to-back measurements of the cylinder.
Then, find the average of the measurements.
 Bore 78.000-78.010 mm
(3.0709- 3.0713 in)
Taper limit 0.050 mm (0.0020 in)
Out of round limit 0.050 mm (0.0020 in)
"C" = maximum of D1 -D6
Taper limit = maximum of D1 or D2 - maximum of D5 or D6
Out of round limit = maximum of D1, D3 or D5 - minimum of D2, D4 or D6
b. If out of specification, replace the cylinder, and replace the piston and piston rings as a set.
c. Measure piston skirt diameter "P" with the micrometer.
 Piston Diameter
77.975-77.990 mm (3.0699- 3.0705 in)
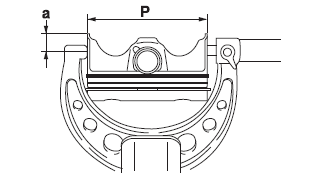
a. 12.0 mm (0.47 in) from the bottom edge of the piston
d. If out of specification, replace the piston and piston rings as a set.
e. Calculate the piston-to-cylinder clearance with the following formula.
Piston-to-cylinder clearance = Cylinder bore "C" - Piston skirt diameter "P"
 Piston-to-cylinder
clearance 0.010-0.035 mm (0.0004-0.0014 in)
f. If out of specification, replace the cylinder, and replace the piston and piston rings as a set.
Checking the piston rings
1. Measure:
- Piston ring side clearance
Out of specification → Replace the piston and piston rings as a set.
TIP
Before measuring the piston ring side clearance, eliminate any carbon deposits from the piston ring grooves and piston rings.
 Piston ring
Top ring
Ring side clearance 0.030-0.065 mm (0.0012-0.0026 in)
Limit 0.115 mm (0.0045 in)
2nd ring Ring side clearance 0.020-0.055 mm (0.0008-0.0022 in)
Limit 0.115 mm (0.0045 in)
2. Install:
- Piston ring (into the cylinder)
TIP
Use the piston crown to level the piston ring near bottom of cylinder "a", where cylinder wear is lowest.
Use the piston crown to level the piston ring near bottom of cylinder "a", where cylinder wear is lowest.
- Piston ring end gap
Out of specification → Replace the piston ring.
TIP
The oil ring expander spacer's end gap cannot be measured. If the oil ring rail's gap is excessive, replace all three piston rings.
 Top ring
End gap (installed) 0.15-0.25 mm (0.0059-0.0098 in)
Limit 0.50 mm (0.0197 in)
2nd ring End gap (installed) 0.30-0.45 mm (0.0118-0.0177 in)
Limit 0.80 mm (0.0315 in)
Oil ring
End gap (installed) 0.10-0.40 mm (0.0039-0.0157 in)
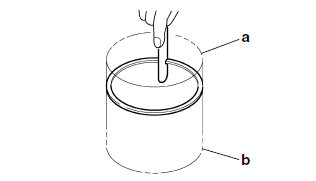
b. Upper of cylinder
Checking the piston pin
The following procedure applies to all of the piston pins.
1. Check:
- Piston pin.
Blue discoloration/grooves → Replace the piston pin and then check the lubrication system.
2. Measure:
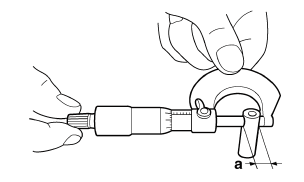
- Piston pin outside diameter "a" Out of specification → Replace the piston pin.
 Piston pin outside
diameter 16.990-16.995 mm (0.6689- 0.6691 in)
Limit 16.970 mm (0.6681 in)
3. Measure:
Piston pin bore inside diameter "b" Out of specification → Replace the piston.
 Piston pin bore inside
diameter 17.002-17.013 mm (0.6694- 0.6698 in)
Limit 17.043 mm (0.6710 in)

4. Calculate:
Piston-pin-to-piston-pin-bore clearance Out of specification → Replace the piston pin and piston as a set.
Piston-pin-to-piston-pin-bore clearance = Piston pin bore inside diameter "b" - Piston pin outside diameter "a"
 Piston-pin-to-piston-pin-bore
clearance 0.007-0.023 mm (0.0003-0.0009 in)
Checking the connecting rods
1. Measure:
- Crankshaft-pin-to-big-end-bearing clearance Out of specification → Replace the big end bearings.
 Oil clearance
0.027-0.051 mm (0.0011-0.0020 in)
The following procedure applies to all of the connecting rods.
NOTICE
Do not interchange the big end bearings and connecting rods. To obtain the correct crankshaft-pin-to-big-end-bearing clearance and prevent engine damage, the big end bearings must be installed in their original positions.
a. Clean the big end bearings, crankshaft pins, and the inside of the connecting rods halves.
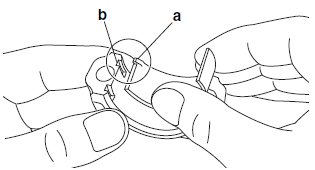
b. Install the big end upper bearing into the connecting rod and the big end lower bearing into the connecting rod cap.
TIP
Align the projections "a" on the big end bearings with the notches "b" in the connecting rod and connecting rod cap.
c. Put a piece of Plastigauge "1" on the crankshaft pin.
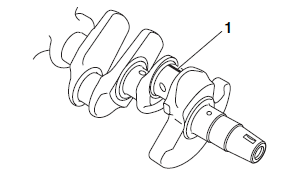
d. Assemble the connecting rod halves.
NOTICE
Tighten the connecting rod bolts using the plastic-region tightening angle method. Always install new bolts.
TIP
- Clean the connecting rod bolts and lubricate the bolt threads and seats with molybdenum disulfide oil.
- Make sure that the projection "a" on the connecting rod cap faces the same direction as the "Y" mark "b" on the connecting rod.
- After installing the big end bearing, assemble the connecting rod and connecting rod cap without installing them onto the crankshaft.

TIP
Install by carrying out the following procedures in order to assemble in the most suitable condition.
e. Tighten the connecting rod bolt while checking that the sections shown "a" and "b" are flush with each other by touching the surface.
 Connecting rod bolt 30
Nm (3.0 m*kgf, 22 ft*lbf)
TIP
To install the big end bearing, care should be taken not to install it at an angle and the position should not be out of alignment.

a. Side machined face
b. Thrusting faces
f. Loosen the connecting rod bolt, remove the connecting rod and connecting rod cap and install these parts to the crankshaft with the big end bearing kept in the current condition.
TIP
- Do not move the connecting rod or crankshaft until the clearance measurement has been completed.
- Make sure that the projection "a" on the connecting rod cap faces the same direction as the "Y" mark "b" on the connecting rod.
- Make sure the "Y" marks "b" on the connecting rods face towards the left side of the crankshaft.

g. Tighten the connecting rod bolts with a torque wrench.
 Connecting rod bolt
(1st) 20 Nm (2.0 m*kgf, 14 ft*lbf)
h. Put a mark "1" on the corner of the connecting rod bolt "2" and the connecting rod cap "3".
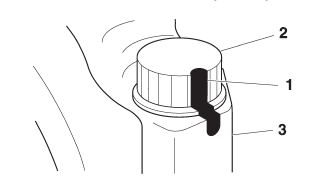
i. Tighten the connecting rod bolts further to reach the specified angle 175º-185º.
 Connecting rod bolt (final)
Specified angle 175º-185º

WARNING
If the bolt is tightened more than the specified angle, do not loosen the bolt and then retighten it. Instead, replace the bolt with a new one and perform the procedure again.
NOTICE
Do not use a torque wrench to tighten the bolt to the specified angle.
j. After the installation, check that the section shown "a" is flush with each other by touching the surface.
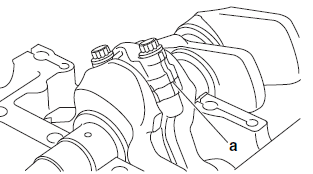
k. Remove the connecting rod and big end bearings.
l. Measure the compressed Plastigauge width on the crankshaft pin. If the crankshaftpin- to-big-end-bearing clearance is out of specification, select replacement big end bearings.
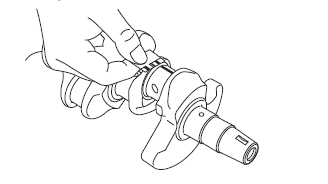
2. Select:
- Big end bearings (P1 -P3)
TIP
- The numbers "A" stamped into the crankshaft web and the numbers "1" on the connecting rods are used to determine the replacement big end bearings sizes.
- "P1 "-"P3 " refer to the bearings shown in the crankshaft illustration.
For example, if the connecting rod "P1 " and the crankshaft web "P1 " numbers are 5 and 2 respectively, then the bearing size for "P1 " is:
"P1 " (connecting rod) - "P1 " (crankshaft) = 5 - 2 = 3 (brown)
 Bearing color code 1.
Blue 2. Black 3. Brown 4.
Green

Installing the connecting rod and piston
The following procedure applies to all of the connecting rods and pistons.
1. Install:
- Big end bearings
- Connecting rod cap (onto the connecting rod)
TIP
- Be sure to reinstall each big end bearing in its original place.
- Align the projections "a" on the big end bearings with the notches "b" in the connecting rods and connecting rod caps.
- Make sure that the projection "c" on the connecting rod cap faces the same direction as the "Y" mark "d" on the connecting rod.

2. Tighten:
- Connecting rod bolts

NOTICE
Tighten the connecting rod bolts using the plastic-region tightening angle method. Always install new bolts.
TIP
Install by carrying out the following procedures in order to assemble in the most suitable condition.
a. Replace the connecting rod bolts with new ones.
b. Clean the connecting rod bolts and lubricate the bolt threads and seats with molybdenum disulfide oil.
c. After installing the big end bearing, assemble the connecting rod and connecting rod cap without installing them onto the crankshaft.
d. Tighten the connecting rod bolt while checking that the sections shown "a" and "b" are flush with each other by touching the surface.
 Connecting rod bolt 30
Nm (3.0 m*kgf, 22 ft*lbf)
TIP
To install the big end bearing, care should be taken not to install it at an angle and the position should not be out of alignment.

a. Side machined face
b. Thrusting faces
e. Loosen the connecting rod bolt, remove the connecting rod and connecting rod cap and install these parts to the crankshaft with the big end bearing kept in the current condition.
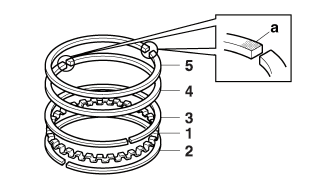
3. Install:
- Oil ring expander "1"
- Lower oil ring rail "2"
- Upper oil ring rail "3"
- 2nd ring "4"
- Top ring "5" (into the piston)
TIP
Be sure to install the piston rings so that the manufacturer's marks or numbers "a" face up.
4. Install:
- Piston "1" (onto the respective connecting rod "2")
- Piston pin "3"
- Piston pin clips "4"

TIP
- Apply engine oil onto the piston pin.
- Make sure that the "Y" mark "a" on the connecting rod faces left when the punch mark "b" on the piston is pointing up as shown.
- Install the piston pin clips, so that the clip ends are 3 mm (0.12 in) "c" or more from the cutout in the piston.
- Reinstall each piston into its original cylinder.

5. Lubricate:
- Piston
- Piston rings
- Cylinder (with the recommended lubricant)
 Recommended lubricant
Engine oil
6. Offset:
- Piston ring end gaps

a. Top ring
b. 2nd ring
c. Upper oil ring rail
d. Oil ring expander
e. Lower oil ring rail
A. Exhaust side
7. Lubricate:
- Crankshaft pins
- Connecting rod big end bearing inner surface (with the recommended lubricant)
 Recommended lubricant
Engine oil
8. Install:
- Piston assemblies "1" (into the cylinder "2" and onto the crankshaft pin)
 Piston installing tool
90890-04161
Piston installing tool YM-04161
NOTICE
If the projection "a" of the piston installing tool damages, you cannot use it. Please handle with care.
TIP
Fit the projection "a" of the piston installing tool "3" and blunt-edged part "b" of the cylinder, fix the position of the piston installing tool, and then push the piston up to the cylinder.

9. Install:
- Connecting rod caps
- Connecting rod bolts
TIP
- Make sure the "Y" marks "a" on the connecting rods face towards the left side of the crankshaft.
- Make sure that the projection "b" on the connecting rod cap faces the same direction as the "Y" mark "a" on the connecting rod.
- Apply Molybdenum disulfide oil to the bolt threads and seats.

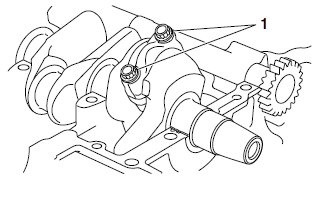
10.Tighten:
- Connecting rod bolts "1"
TIP
Tighten the connecting rod bolts using the following procedure.
a. Tighten the connecting rod bolts with a torque wrench.
 Connecting rod bolt
(1st) 20 Nm (2.0 m*kgf, 14 ft*lbf)
b. Put a mark "1" on the corner of the connecting rod bolt "2" and the connecting rod cap "3".
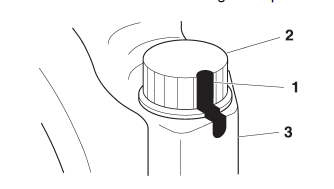
c. Tighten the connecting rod bolts further to reach the specified angle 175º-185º.
 Connecting rod bolt
(final) Specified angle 175º-185º

WARNING
If the bolt is tightened more than the specified angle, do not loosen the bolt and then retighten it. Instead, replace the bolt with a new one and perform the procedure again.
NOTICE
Do not use a torque wrench to tighten the bolt to the specified angle.
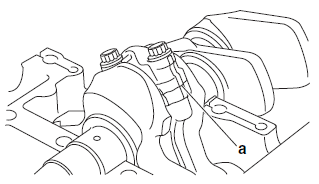
d. After the installation, check that the section shown "a" is flush with each other by touching the surface.
WARNING
If the connecting rod and cap are not flush with each other, remove the connecting rod bolts and big end bearing and restart from step (1). In this case, make sure to replace the connecting rod bolts.
See also:
 Yamaha Tracer MT09TRA - Service manual > Crankcase
Disassembling the crankcase 1. Place the engine upside down. 2. Remove: Crankcase bolt (x 30)
 Yamaha Tracer MT09TRA - Service manual > Crankshaft and balancer shaft
Removing the crankshaft and balancer shaft 1. Remove: Balancer shaft "1" Balancer shaft journal bearing Crankshaft assembly "2" Crankshaft journal bearings

 BMW G310GS
 Honda CBR125RW
 Husqvarna 401 Vitpilen
 KTM 890 Duke R
 Mash Dirt Track 650
 Peugeot Kisbee
 Yamaha Tracer MT-09
 Honda CBR125RW
 Peugeot Kisbee
 Yamaha Tracer MT-09