 Husqvarna 401 Vitpilen - Owner's Manual > Changing the turn signal bulb
Note
Damage to reflector Grease on the reflector reduces the brightness.
Grease on the bulb will evaporate due to the heat and be deposited on the reflector.
- Clean and degrease the bulbs before mounting.
- Do not touch the bulbs with your bare hands.
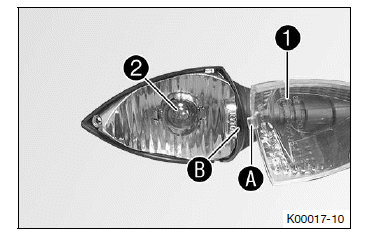
- Remove the screw on the rear of the turn signal housing.
- Carefully remove diffuser 1.
- Push bulb 2 lightly into the socket, turn approx. 30º counterclockwise, and pull it out of the socket.
Info
Do not touch the reflector with your fingers and keep it free from grease.
- Lightly push the new lamp into the socket and turn all the way clockwise.
Turn signal (RY10W / socket BAU15s)
- Check that the turn signal is functioning properly.
- Position the diffuser.
Info
Insert catch A into recess B.
- Insert the screw and first turn counterclockwise until it engages in the thread with a small jerk. Tighten the screw lightly.
Checking the headlight setting
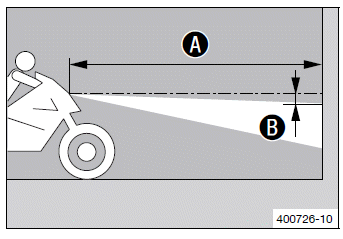
- Position the vehicle upright on a horizontal surface in front of a light wall and make a marking at the height of the center of the low beam headlight.
- Make another mark at a distance B under the first marking.
Guideline

- Position the vehicle perpendicular to the wall at a distance A from the wall and switch on the low beam.
Guideline

- The rider now mounts the motorcycle with luggage and passenger if applicable.
- Check the headlight setting.
The light-dark boundary must lie exactly on the lower marking when the motorcycle is ready to operate with the rider mounted along with any luggage and a passenger if applicable.
If the light-dark border does not meet specifications:
- Adjust the headlight range.
Adjusting the headlight range
Preparatory work
- Check the headlight setting.
Main work
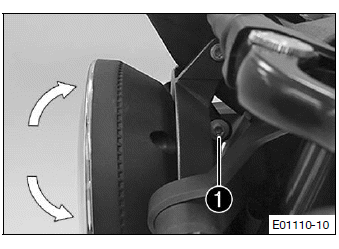
- Loosen screw 1.
- To set the headlight range of the headlight, swivel the headlight upwards or downwards.
Info
Swiveling the headlight upwards increases the headlight range. Swiveling the headlight downwards reduces the headlight range.
If you have a payload, you may have to correct the headlight range.
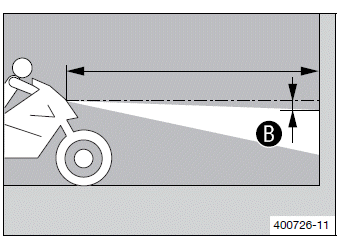
- Set the headlight to marking B.
Guideline
The light-dark boundary must lie exactly on lower marking B when the motorcycle is ready to operate with the rider mounted along with any luggage and a passenger if applicable.
- Tighten screw 1.
Info
Screw 1 also secures the headlight. Make sure that screw is always tightened.
Diagnostics connector
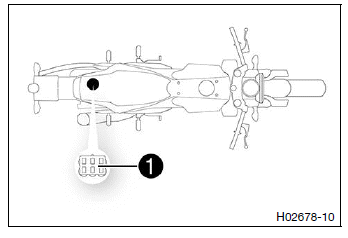
Diagnostics connector 1 is located under the seat.
Front ACC1 and ACC2
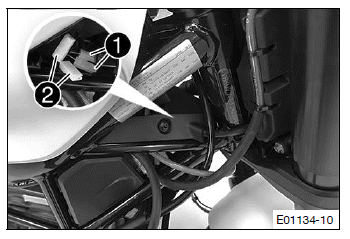
Installation location
- Power supplies ACC1 1 and ACC2 2 front are located under the cover in front of the steering stem.
ACC2 rear
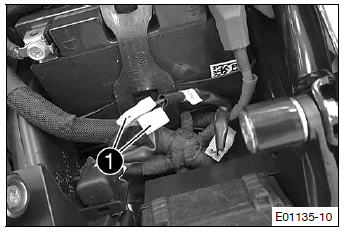
Installation location
- Power supplies ACC2 1 rear are located under the seat.
See also:
 Husqvarna 401 Vitpilen - Owner's Manual > Changing the ABS fuses
Info Two fuses for the ABS are located under the protection cap next to the fuse box. These fuses protect the return pump and the hydraulic unit of the ABS. The third fuse, which protects the ABS control unit, is located in the fuse box.
 Husqvarna 401 Vitpilen - Owner's Manual > Cooling system
Cooling system Water pump 1 in the engine ensures forced circulation of the coolant.

 BMW G310GS
 Honda CBR125RW
 Husqvarna 401 Vitpilen
 KTM 890 Duke R
 Mash Dirt Track 650
 Peugeot Kisbee
 Yamaha Tracer MT-09
 Honda CBR125RW
 Peugeot Kisbee
 Yamaha Tracer MT-09