 Honda CBR125RW - Service manual > Crankshaft/Balancer/Transmission
COMPONENT LOCATION
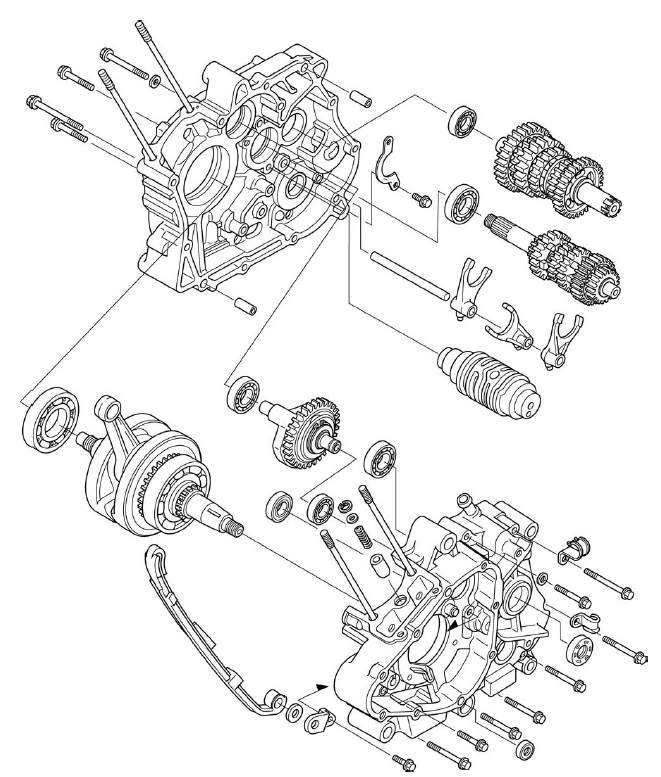
SERVICE INFORMATION
GENERAL
- This section covers crankcase separation for service of the crankshaft, transmission and balancer.
- The crankcase must be separated to service the crankshaft, balancer and transmission. To service these parts, the engine must be removed from the frame.
- The following components must be removed before separating the
crankcase.
- Camshaft
- Cylinder head
- Cylinder/piston
- Clutch
- Gearshift linkage
- Oil pump
- Primary drive gear
- Flywheel
- Neutral switch
- Starter motor
- Engine
- Be careful not to damage the crankcase mating surfaces when servicing.
- Clean the oil passages before assembling the crankcase halves.
- Prior to assembling the crankcase halves, apply sealant to their mating surfaces. Wipe off excess sealant thoroughly.
SPECIFICATIONS
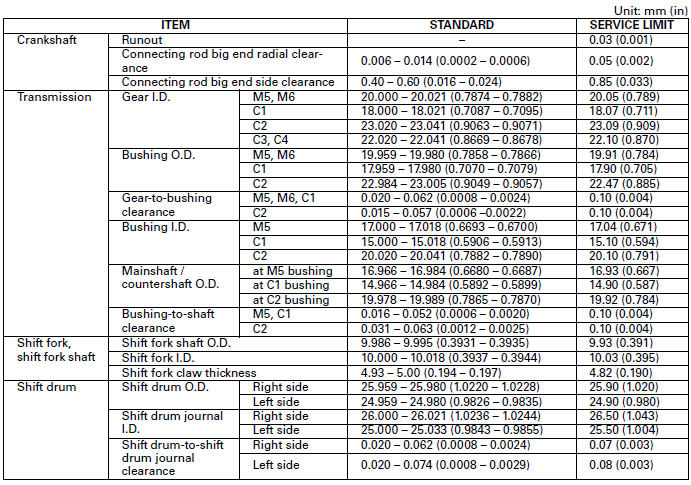
TOOLS
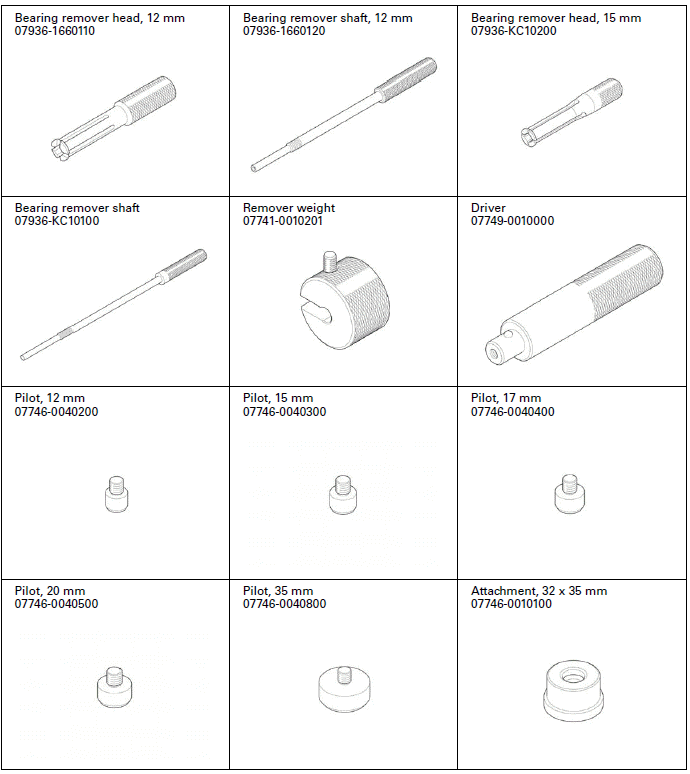
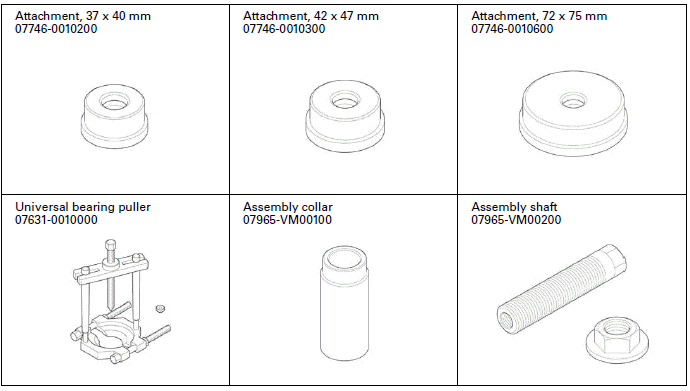
TROUBLESHOOTING
Excessive noise
- Worn, seized or chipped transmission gear
- Worn or damaged transmission bearing
- Worn or damaged connecting rod big end bearing
- Worn crankshaft bearing
- Worn connecting rod small end
- Worn balancer bearing
- Improper balancer installation
Hard to shift
- Bent shift fork
- Bent shift fork shaft
- Damaged shift drum guide groove
- Damaged shift fork guide pin
- Bent shift fork claw
- Damaged gearshift spindle
- Loose shift drum stopper arm bolt
Transmission jumps out of gear
- Worn gear dogs or dog holes
- Damaged shift drum guide groove
- Worn shift fork guide pin
- Worn shift fork groove in gear
- Worn shift fork shaft
- Bent shift fork shaft
- Weak or broken gearshift spindle return spring
Engine vibration
- Excessive crankshaft runout
- Improper balancer timing
CRANKCASE SEPARATION
NOTE:
If you replace the crankcase, record the identification color of the following gears:
- Primary drive gear
- Balancer driven gear
Refer to Service Information for removal of necessary parts before disassembling the crankcase.
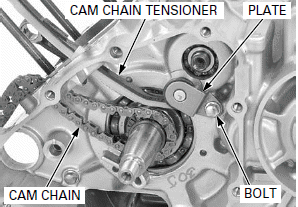
Remove the tensioner guide plate bolt, plate and cam chain tensioner.
Remove the cam chain.
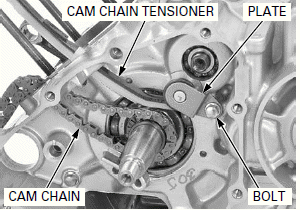
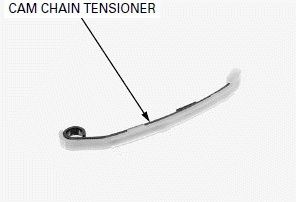
Check the cam chain tensioner for excessive wear or damage, replace if necessary.
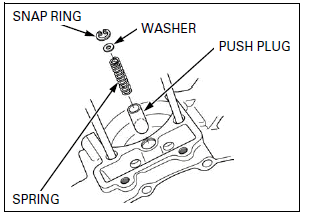
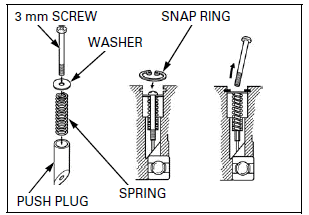
Remove the snap ring, washer, spring and bearing push plug from the left crankcase.
Check the bearing push plug for wear or damage and replace if necessary.
Check the spring for fatigue or damage and replace if necessary.
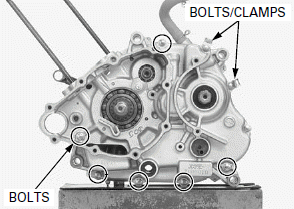
Loosen the left crankcase bolts in a crisscross pattern in 2 or 3 steps, and remove the bolts and clamps.
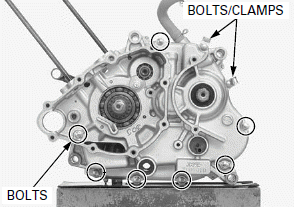
Disconnect the crankcase breather hose.
Loosen the right crankcase bolts in a crisscross pattern in 2 or 3 steps, and remove the bolts and washer.
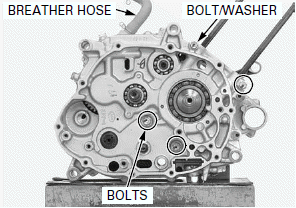
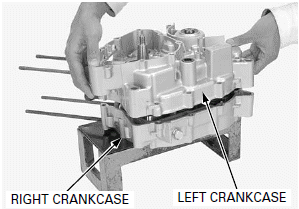
Place the crankcase assembly with the right side down.
Do not pry the crankcase halves with a screwdriver.
Carefully separate the left crankcase from the right crankcase while tapping them at several locations with a plastic hammer.
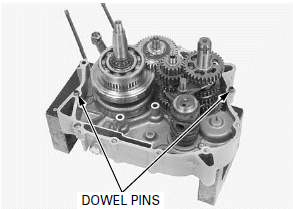
Remove the dowel pins.
CRANKSHAFT/BALANCER
REMOVAL
Separate the crankcase halves.
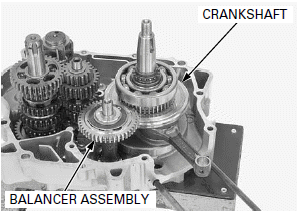
Remove the crankshaft and balancer assembly from the right crankcase.
CRANKSHAFT INSPECTION
CRANKSHAFT RUNOUT
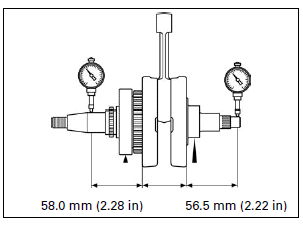
Place the crankshaft on V-blocks.
Set the dial indicator on the crankshaft.
Rotate the crankshaft two revolutions (720º) and read the runout.
SERVICE LIMIT: 0.03 mm (0.001 in)
BIG END SIDE CLEARANCE
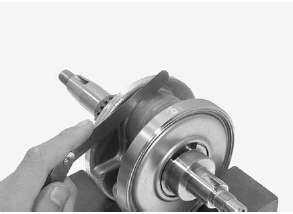
Measure the side clearance of the connecting rod big end with a feeler gauge.
SERVICE LIMIT: 0.85 mm (0.033 in)
BIG END RADIAL CLEARANCE
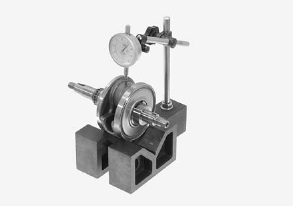
Measure the radial clearance of the connecting rod big end.
SERVICE LIMIT: 0.05 mm (0.002 in)
TIMING SPROCKET
If the timing sprocket teeth are worn or damaged, check the cam chain, tensioner and cam sprocket.
Check the timing sprocket teeth for wear or damage.
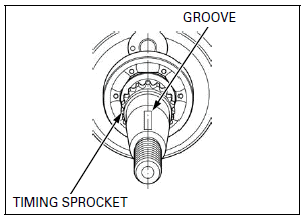
If you are replacing the timing sprocket, align the center of the sprocket teeth with the center of the woodruff key groove as shown.
CRANKSHAFT BEARING
RIGHT SIDE:
Turn the inner race of the right crankshaft bearing with your finger.
The bearing should turn smoothly and quietly.
Also check that the outer race fits tightly in the crankcase.
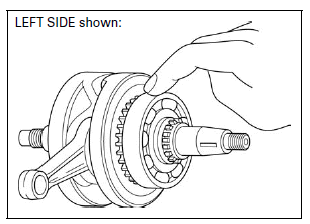
LEFT SIDE:
Turn the outer race of the left crankshaft bearing with your finger.
The bearing should turn smoothly and quietly.
Also check that the inner race fits tightly on the crankshaft.
Replace the bearing in pairs.
Remove and discard the bearing if the races do not turn smoothly, quietly, or if they fit loosely in the crankcase and crankshaft.
BALANCER BEARING
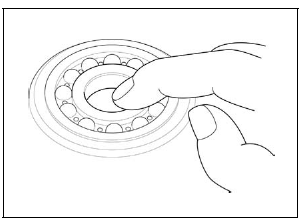
Turn the inner race of the right crankshaft bearing with your finger.
The bearing should turn smoothly and quietly.
Also check that the outer race fits tightly in the crankcase.
Remove and discard the bearing if the races do not turn smoothly, quietly, or if they fit loosely in the crankcase and crankshaft.
BALANCER DISASSEMBLY
NOTE:
If you replace the balancer driven gear, be careful to select the identification color of the balancer driven gear.
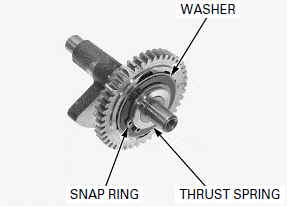
Remove the following:
- Snap ring
- Thrust spring
- Washer
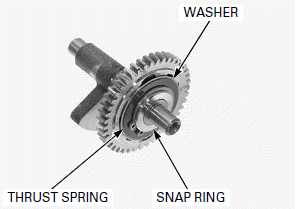
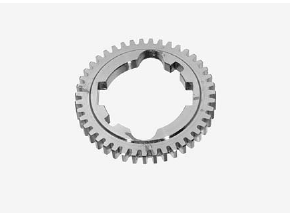
Remove the balancer damper rubbers, balancer gear springs and balancer driven gear.
Check the rubbers and springs for damage, replace it if necessary.
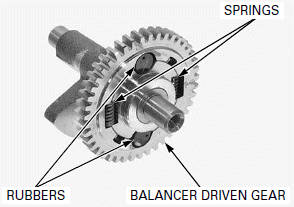
Check the balancer driven gear for excessive or damage, replace it if necessary.
BALANCER ASSEMBLY
Apply molybdenum oil solution to the balancer driven gear inner surface.
Install the balancer driven gear, balancer gear springs and balancer damper rubbers.
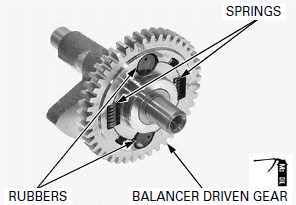
Make sure the snap ring is firmly seated in the groove.
Install the following:
- Washer
- Thrust spring
- Snap ring
BALANCER DRIVEN GEAR SELECTION
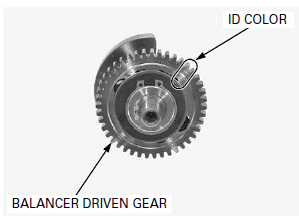
The balancer driven gear has ID color.
BALANCER DRIVEN GEAR SELECTION TABLE

If the balancer driven gear is replaced with a new one, select the same colored gear as the original gear.
If the crankcase is replaced a new one, select the blue marked gear.
INSTALLATION
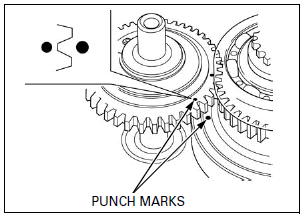
Engage the balancer assembly and crankshaft by aligning the two punch marks on the balancer driven gear and crank weight as shown.
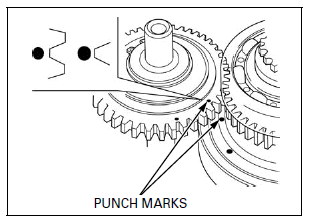
Be careful not to out of alignment.
Install the crankshaft and balancer assembly together into the right crankcase.
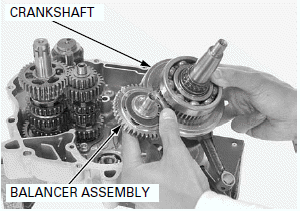
After installing the crankshaft and balancer assembly, make sure to align the two punch marks on the balancer driven gear and crank weight.
Assemble the crankcase.
TRANSMISSION
REMOVAL/DISASSEMBLY
Separate the crankcase halves.
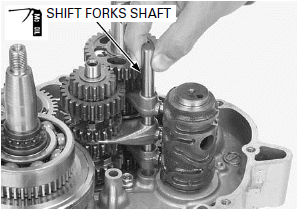
Pull the shift fork shaft and remove it from the shift forks.
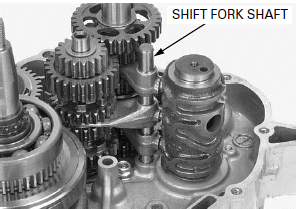
Remove the shift forks and shift drum.
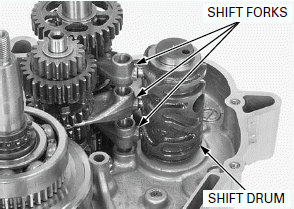
Be sure to remove the three end washers (mainshaft: left only/countershaft: both ends).
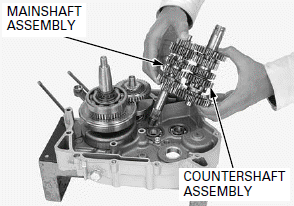
Remove the mainshaft assembly and countershaft assembly together.
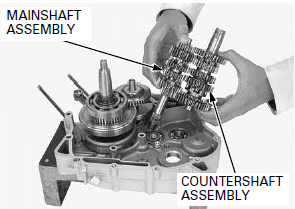
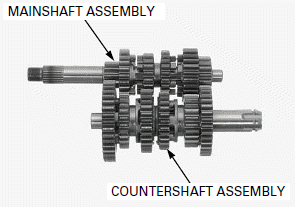
Disassemble the mainshaft assembly and countershaft assembly.
NOTE:
- Keep track of the disassembled parts (gears, bushings, washers, and snap rings) by sliding them onto a tool or a piece of wire.
- Do not expand the snap ring more than necessary for removal. To remove a snap ring, expand the snap ring and pull it off using the gear behind it.
INSPECTION
GEARS/BUSHINGS
Check the gear shifter groove, dogs, dog holes and teeth for damage or excessive wear.
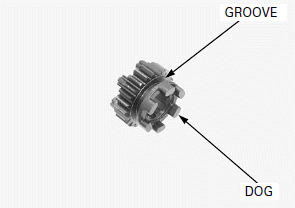
Measure the I.D. of each gear.
SERVICE LIMITS:
M5, M6: 20.05 mm (0.789 in)
C1: 18.07 mm (0.711 in)
C2: 23.09 mm (0.909 in)
C3, C4: 22.10 mm (0.870 in)
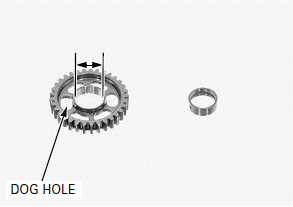
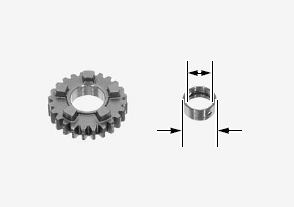
Check the bushings for wear or damage.
Measure the O.D. of each bushing.
SERVICE LIMITS:
M5, M6: 19.91 mm (0.784 in)
C1: 17.90 mm (0.705 in)
C2: 22.47 mm (0.885 in)
Calculate the gear-to-bushing clearance.
SERVICE LIMIT:
M5, M6, C1, C2: 0.10 mm (0.004 in)
Measure the I.D. of each bushing.
SERVICE LIMITS:
M5: 17.04 mm (0.671 in)
C1: 15.10 mm (0.594 in)
C2: 20.10 mm (0.791 in)
MAINSHAFT/COUNTERSHAFT
Check the spline grooves and sliding surfaces for abnormal wear or damage.
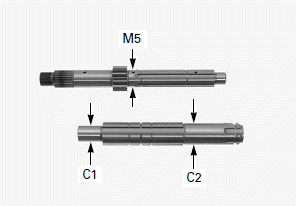
Measure the O.D. of the mainshaft and countershaft at the gear and bushing sliding areas.
SERVICE LIMITS:
Mainshaft
(at M5 gear bushing): 16.93 mm (0.667 in)
Countershaft
(at C1 gear bushing): 14.90 mm (0.587 in)
(at C2 gear bushing): 19.92 mm (0.784 in)
Calculate the bushing-to-shaft clearance.
SERVICE LIMIT:
M5, C1, C2: 0.10 mm (0.004 in)
SHIFT DRUM/DRUM JOURNAL
Inspect the shift drum end for scoring, scratches, or evidence of un sufficient lubrication.
Check the shift drum grooves for abnormal wear or damage.
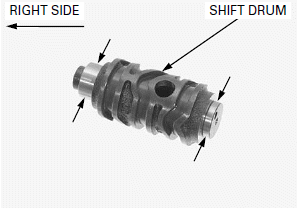
Measure the shift drum O.D. at each end.
SERVICE LIMITS:
Right side: 25.90 mm (1.020 in)
Left side: 24.90 mm (0.980 in)
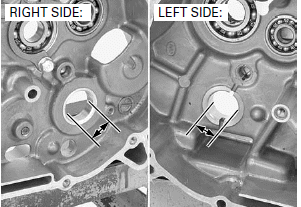
Check the shift drum journal in the each crankcase for excessive wear or damage.
Measure the shift drum journal I.D.
SERVICE LIMITS:
Right side: 26.50 mm (1.043 in)
Left side: 25.50 mm (1.004 in)
Calculate the shift drum- to-shift drum journal clearances.
SERVICE LIMITS:
Right side: 0.07 mm (0.003 in)
Left side: 0.08 mm (0.003 in)
SHIFT FORK
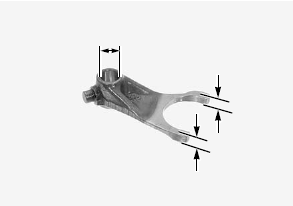
Check the shift forks for deformation or abnormal wear.
Check the shift fork guide pin for abnormal wear or damage.
Measure each shift fork claw thickness.
SERVICE LIMIT: 4.82 mm (0.190 in)
Measure I.D. of each fork.
SERVICE LIMIT: 10.03 mm (0.395 in)
SHIFT FORK SHAFT
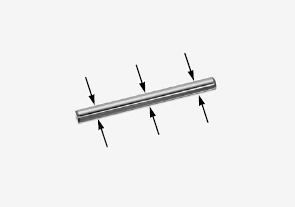
Check the shift fork shafts for damage and straightness.
Measure the shift fork shaft O.D. at three points.
SERVICE LIMIT: 9.93 mm (0.391 in)
TRANSMISSION BEARING
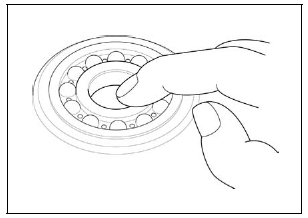
Turn the inner race of each bearing with your finger.
The bearings should turn smoothly and quietly.
Also check that the outer race fits tightly in the crankcase.
Remove and discard the bearing if the races do not turn smoothly, quietly, or if they fit loosely in the crankcase.
ASSEMBLY/INSTALLATION
Clean all parts in solvent, and dry them thoroughly.
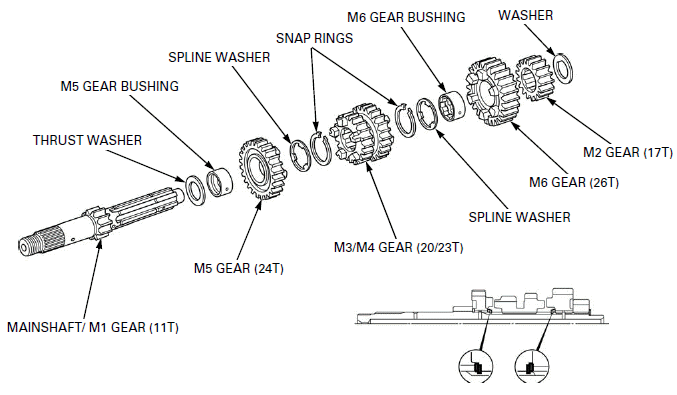
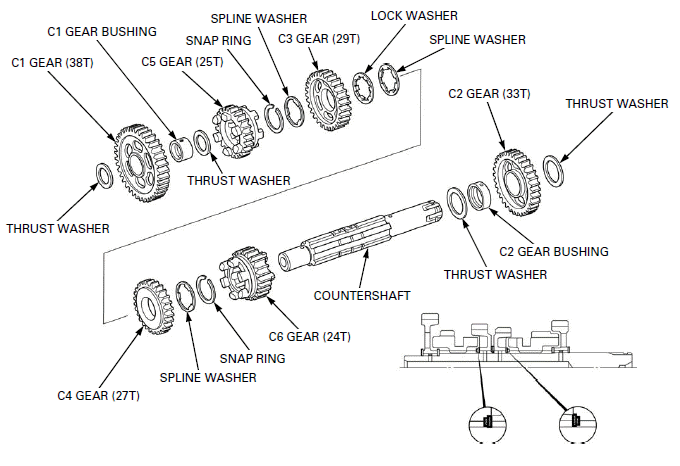
Apply molybdenum oil solution to the gear rotating surface (M5, M6, C1, C2, C3, C4), bushing entire surface (M5, M6, C1, C2), shift fork grooves (M3/4, C5, C6) to ensure initial lubrication.
Assemble all parts into their original positions.
NOTE:
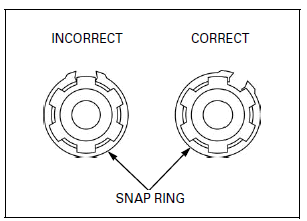
- Install the washers and snap rings with the chamfered edge facing the thrust load side. Confirm the inner side of snap rings and washer when you detect the chamfered side.
- Do not reuse worn snap ring which could easily spin in the groove.
- Check that the snap rings are seated in the grooves and align their end gaps with the grooves of the spline.
MAINSHAFT
COUNTERSHAFT
Check the gears for freedom of movement or rotation on each shaft.
Apply engine oil to the transmission gear teeth.
Engage the mainshaft assembly and countershaft assembly.
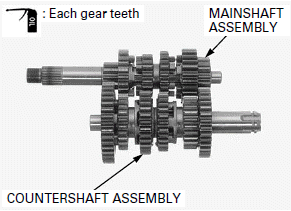
Be sure to install the three end washers (mainshaft; left only/countershaft; both ends).
Install the mainshaft assembly and countershaft assembly together into the right crankcase.
Each shift fork has an identification marks, "R" is for the right shift fork, "L" is the left shift fork and "C" is for the center shift fork.
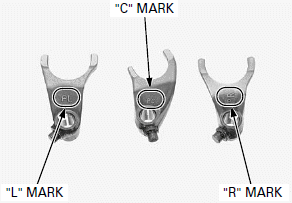
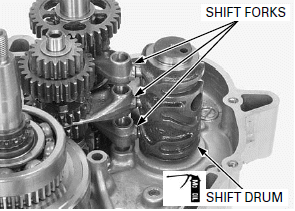
Install the shift forks into the shifter gear grooves with the marks facing up (left crankcase side).
Apply molybdenum oil solution to the shift drum journal outer surface and install it, while aligning the shift fork guide pins with the guide grooves.
Apply molybdenum oil solution to the shift fork shaft outer surface and insert it through the shift forks into the right crankcase.
After installation, check for smooth transmission operation.
Assemble the crankcase.
BEARING REPLACEMENT
CRANKSHAFT BEARING
Remove the crankshaft.
Remove the left crankshaft bearing using a special tool.
TOOL: Universal bearing puller 07631-0010000 or equivalent
NOTE:
Always replace the left bearing with a new one whenever the crankshaft is removed.
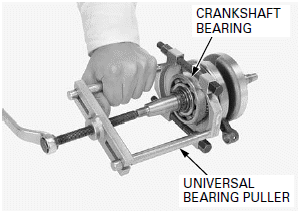
Remove the transmission.
Drive out the right crankshaft bearing from the right crankcase.
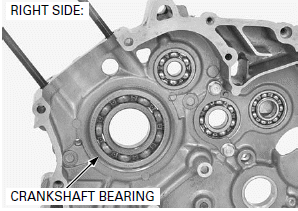
Install new left crankshaft bearing to the crankshaft left side using the special tools.
TOOLS:
Assembly collar 07965-VM00100
Assembly shaft 07965-VM00200
Draw the crankshaft into the bearing inner race.
After installation, apply engine oil to the left crankshaft bearing.

Drive in new right crankshaft bearing into the right crankcase with the marked side facing up until it is fully seated using the special tools.
TOOLS:
Driver 07749-0010000
Attachment, 72 x 75 mm 07746-0010600
Pilot, 35 mm 07746-0040800
Install the crankshaft.
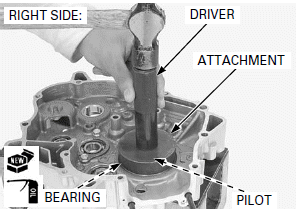
BALANCER/TRANSMISSION BEARING
Remove the following:
- Crankshaft/balancer
- Transmission
RIGHT CRANKCASE SIDE
Remove the bolts and mainshaft bearing setting plate.
Drive out the mainshaft and balancer bearings.
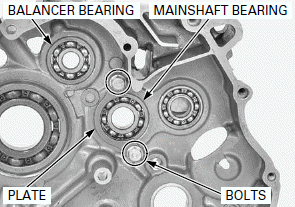
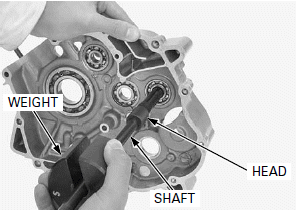
Remove the countershaft bearing using the special tools.
TOOLS:
Bearing remover head, 15 mm 07936-KC10200
Bearing remover shaft 07936-KC10100
Remover weight 07741-0010201
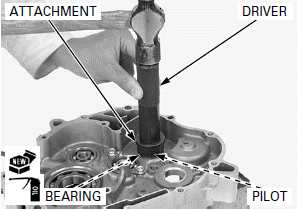
Drive in new bearings into the right crankcase until they are fully seated using the special tools.
TOOLS:
Mainshaft bearing (marked side facing up):
Driver 07749-0010000
Attachment, 37 x 40 mm 07746-0010200
Pilot, 17 mm 07746-0040400
Countershaft bearing (sealed side facing down):
Driver 07749-0010000
Attachment, 32 x 35 mm 07746-0010100
Pilot, 15 mm 07746-0040300
Balancer bearing (marked side facing up):
Driver 07749-0010000
Attachment, 37 x 40 mm 07746-0010200
Pilot, 12 mm 07746-0040200
After installation, apply engine oil to each bearing rotating area.
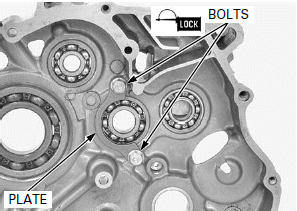
Apply locking agent to the mainshaft bearing setting plate bolt threads.
Install the setting plate and bolts.
Tighten the bolts.
LEFT CRANKCASE SIDE
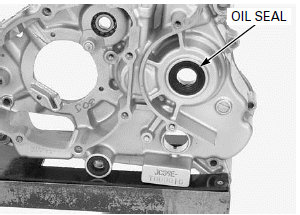
Remove the countershaft oil seal from the left crankcase.
Drive out the countershaft and balancer bearings.
Remove the mainshaft bearing using the special tools.
TOOLS:
Bearing remover head, 12 mm 07936-1660110
Bearing remover shaft 07936-1660120
Remover weight 07741-0010201
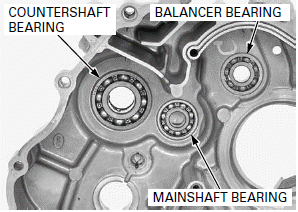
Drive in new bearings into the left crankcase until they are fully seated using the special tools.
TOOLS:
Mainshaft bearing (sealed side facing down):
Driver 07749-0010000
Attachment, 32 x 35 mm 07746-0010100
Pilot, 12 mm 07746-0040200
Countershaft bearing (marked side facing up):
Driver 07749-0010000
Attachment, 42 x 47 mm 07746-0010300
Pilot, 20 mm 07746-0040500
Balancer bearing (marked side facing up):
Driver 07749-0010000
Attachment, 32 x 35 mm 07746-0010100
Pilot, 12 mm 07746-0040200
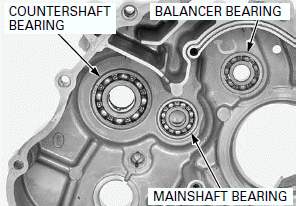
After installation, apply engine oil to each bearing rotating area.
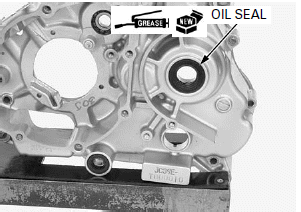
Apply grease to new countershaft oil seal lips.
Install the countershaft oil seal until it is flush with the crankcase surface.
CRANKCASE ASSEMBLY
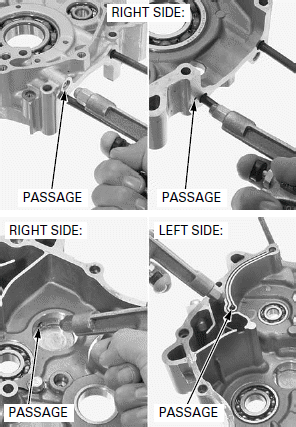
Clean the oil passages of each crankcase using compressed air.
Check the oil passage for clogs.
Clean the left and right crankcase mating surfaces thoroughly, being careful not to damage them and check for damage.
Apply a light but thorough coating of sealant (TB1215 or equivalent) to left crankcase mating surfaceexcept the oil passage area.
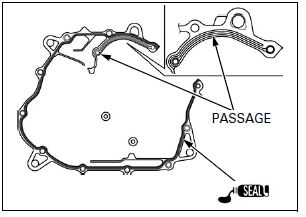
Install the dowel pins.
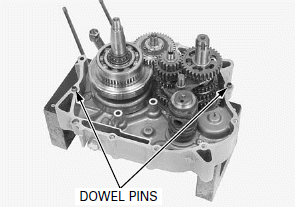
Do not force the crankcase halves together, If there is excessive force required, something is wrong. Remove the left crankcase and check for misaligned parts.
Install the left crankcase on the right crankcase, being careful not to damage the oil seal lips.
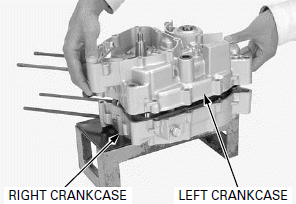
Install the right crankcase bolts and washer, and tighten the bolts in a crisscross pattern in 2 or 3 steps.
Connect the crankcase breather hose.
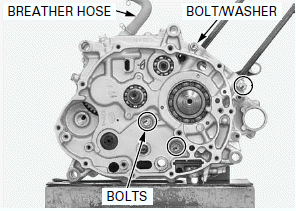
Install the left crankcase bolts and clamps and tighten the bolts in a crisscross pattern in 2 or 3 steps.
Install the spring, washer and suitable 3 mm screw to the bearing push plug, then install them into the left crankcase.
Make sure the snap ring is firmly seated in the groove.
Install the snap ring and remove the screw.
Install the cam chain through the crankcase.
Install the cam chain over the timing sprocket.
Install the cam chain tensioner and tensioner guide plate.
Install and tighten the tensioner guide plate bolt.
Install the removed parts in the reverse order of removal.
See also:
 Honda CBR125RW - Service manual > Alternator/Starter Clutch
COMPONENT LOCATION SERVICE INFORMATION

 BMW G310GS
 Honda CBR125RW
 Husqvarna 401 Vitpilen
 KTM 890 Duke R
 Mash Dirt Track 650
 Peugeot Kisbee
 Yamaha Tracer MT-09
 Honda CBR125RW
 Peugeot Kisbee
 Yamaha Tracer MT-09