 Honda CBR125RW - Service manual > Drive Chain
DRIVE CHAIN SLACK INSPECTION
Never inspect and adjust the drive chain while the engine is running.
Turn the ignition switch OFF, support the motorcycle on its sidestand and shift the transmission into neutral.
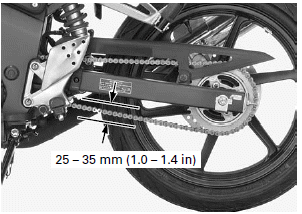
Check the slack in the drive chain lower run midway between the sprockets.
DRIVE CHAIN SLACK: 25 - 35 mm (1.0 - 1.4 in)
 Excessive chain
slack, 50 mm (2.0 in) or more, may damage the frame.
ADJUSTMENT
Loosen the axle nut.
Loosen the lock nuts and turn the adjusting nuts until the correct drive chain slack is obtained.
Make sure the index lines on both adjusting plates are aligned with the rear end of the axle slots in the swingarm.
Tighten the axle nut to the specified torque.
TORQUE: 59 N-m (6.0 kgf-m, 44 lbf-ft)
Hold the adjusting nuts and tighten the lock nuts.
Recheck the drive chain slack and free wheel rotation.

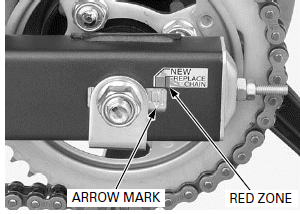
Check the drive chain wear indicator label attached on the left swingarm.
If the drive chain adjusting plate arrow mark reaches red zone of the indicator label, replace the drive chain with a new one.
CLEANING AND LUBRICATION
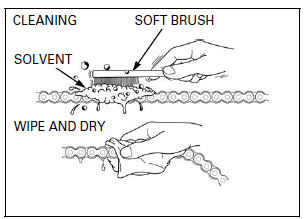
Clean the chain with non-flammable or high flash point solvent and wipe it dry.
Be sure the chain has dried completely before lubricating.
Inspect the drive chain for possible damage or wear.
Replace any chain that has damaged rollers, loose fitting links, or otherwise appears unserviceable.
Installing a new chain on badly worn sprockets will cause the new chain to wear quickly.
Inspect and replace sprocket as necessary.
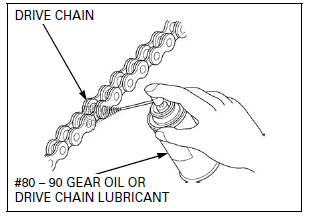
Lubricate the drive chain with #80 - 90 gear oil or drive chain lubricant designed specifically for use with O-ring chains. Wipe off the excess oil or drive chain lubricant.
SPROCKET INSPECTION
Remove the drive sprocket cover.
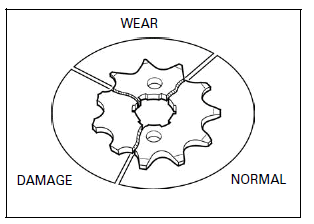
Inspect the drive and driven sprocket teeth for wear or damage, replace if necessary.
Never use a new drive chain on worn sprockets.
Both chain and sprockets must be in good condition, or new replacement chain will wear rapidly.
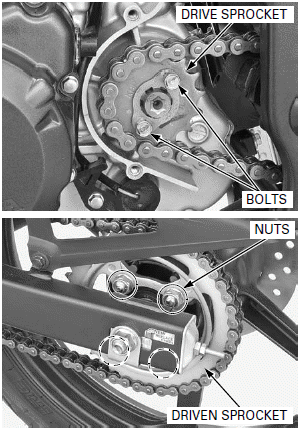
Check the attaching bolts and nuts on the drive and driven sprockets.
If any are loose, torque them.
TORQUE:
Drive sprocket fixing plate bolt: 10 N-m (1.0 kgf-m, 7 lbf-ft)
Driven sprocket nut: 64 N-m (6.5 kgf-m, 47 lbf-ft)
Install the drive sprocket cover.
REPLACEMENT
This motorcycle uses a drive chain with a staked master link.
Loosen the drive chain.
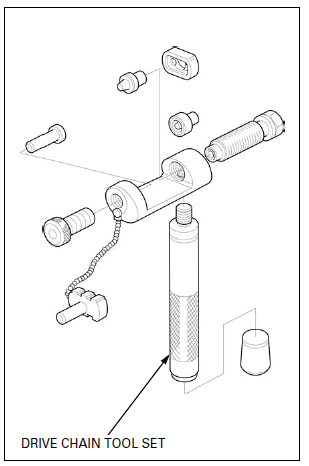
Assemble the special tool as shown.
When using the special tool, follow the manufacturer's instruction.
TOOL: Drive chain tool set 07HMH-MR10103
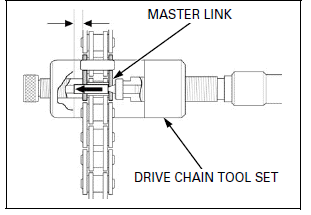
Locate the crimped pin ends of the master link from the outside of the drive chain, and remove the link with the drive chain tool set.
TOOL: Drive chain tool set 07HMH-MR10103
Remove the drive chain.
Include the master link when you count the drive chain links.
Remove the excess drive chain links from a new drive chain with the drive chain tool set.
STANDARD LINKS: 124 LINKS
REPLACEMENT CHAIN
DID: 428VI3-124LE
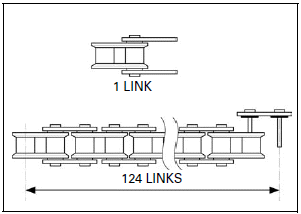
NOTE:
Never reuse the old drive chain, master link, master link plate and O-rings.
Insert the master link from the inside of the drive chain, and install the plate with the identification mark facing the outside.
Assemble the new master link, O-rings and plate.
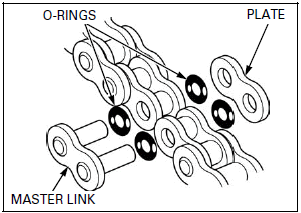
Assemble and set the drive chain tool set.
TOOL: Drive chain tool set 07HMH-MR10103
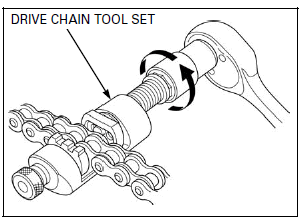
Make sure that the master link pins are installed properly.
Measure the master link pin length projected from the plate.
STANDARD LENGTH: Approx. 1.1 mm (0.04 in)
Stake the master link pins.
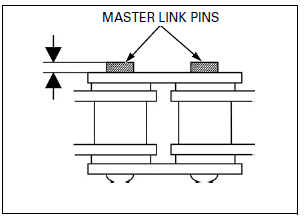
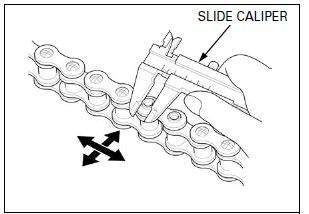
Make sure that the pins are staked properly by measuring the diameter of the staked area using a slide caliper.
DIAMETER OF THE STAKED AREA: 4.75 - 4.95 mm (0.187 - 0.195 in)
A drive chain with a clip-type master link must not be used.
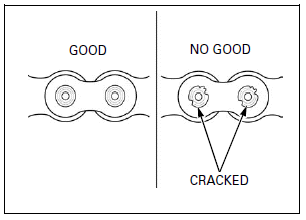
After staking, check the staked area of the master link for cracks.
If there is any cracking, replace the master link, O-rings and plate.
See also:
 Honda CBR125RW - Service manual > Engine Oil
OIL LEVEL INSPECTION Hold the motorcycle in an upright position. Start the engine and let it idle for 3 - 5 minutes. Stop the engine and wait 2 - 3 minutes.
 Honda CBR125RW - Service manual > Brake Fluid
Spilled fluid can damage painted, plastic or rubber parts. Place a rag over these parts whenever the system is serviced. Do not mix different types of fluid, as they are not compatible with each other. Do not allow foreign material to enter the system when filling the reservoir. When the fluid level is low, check the brake pads for wear. A low fluid level may be due to wear of the brake pads. If the brake pads are worn and caliper pistons are pushed out, this accounts for a low fluid level. If the brake pads are not worn and fluid level is low, check the entire system for leaks.

 BMW G310GS
 Honda CBR125RW
 Husqvarna 401 Vitpilen
 KTM 890 Duke R
 Mash Dirt Track 650
 Peugeot Kisbee
 Yamaha Tracer MT-09
 Honda CBR125RW
 Peugeot Kisbee
 Yamaha Tracer MT-09